Page 27
Using Layers
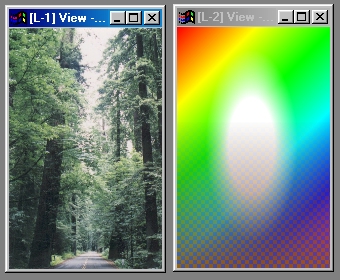
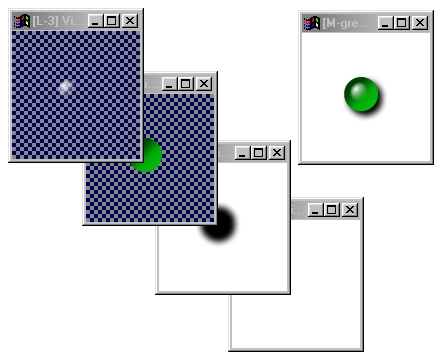 This is a four-layer image. The master image (marked with [M-]) is not a layer, it is the
combined output created from the layers. The master is at the top right; it has the key [M-...] in it's title bar. The others are layers, as shown by the [L-n] keys in the title bars.
This is a four-layer image. The master image (marked with [M-]) is not a layer, it is the
combined output created from the layers. The master is at the top right; it has the key [M-...] in it's title bar. The others are layers, as shown by the [L-n] keys in the title bars.
Look interesting? Be sure to visit the Gel Tutorial |
Introduction
What are Layers?
To begin with, you can think of layers as perfectly transparent sheets of film, laid one on top of another in a stack. Of course, if they're all transparent, the whole stack is transparent. That's true here, also.
So, imagine a stack made of two sheets of transparent film.
If you paint something large on the bottom sheet of film, you can see it through the top sheet (because it is still unpainted). But if you now paint something small on the top sheet, you can see everything on the bottom sheet, except what the painting on the top sheet covers. If you move the top sheet, the small painting on it appears to "move" over the bottom sheet. If you don't like the results on the top sheet, you can throw it away without losing the painting on the bottom sheet - and likewise, if the bottom sheet is not pleasing, you can throw it out without losing the work on the top sheet.
This is the basis for layers in WinImages F/x. There are differences from the real-world stack of film sheets, but they are all in your favor.
Some of those advantages are:
- You can stack an unlimited number of sheets in your layered images and the stack remains completely transparent.
- You can work on every sheet, or layer, independently of the others
- All layers may be offset from one another, allowing you to "slide" layers around without limit.
- Sheets can be different sizes from one another, yet you can still handle them without the stack becoming difficult to manage.
- "Overlay" is not the only way that layers can be combined - there are over sixty layer combination modes that give beautiful and interesting results you can't get with "real" layers no matter what you do.
- Any layer can re-position other layers above it.
- You can rearrange the order of the layers in the stack to any degree you wish.
- You can save your layered images in the layered state, and come back to work with them later.
- Layers can geometrically distort other layers just as they can cover them with paint.
- You can save a resulting combination image or any individual layer in any normal image format at any time without disturbing the layered image at all.
Overall, image layers within WinImages F/x are a powerful, flexible and easy to use means to build up complex images from simple components.
More formally, WinImages layered images have the following useful characteristics:
- Layered images combine to form a "master view", which is not a layer.
- Images may have any number of layers, based on memory.
- There is no "base layer", any image layer may be re-arranged at will.
- Over 60 layer combination modes are available such as normal, multiply, add, warp, etc.
- Image layers may be moved to any degree, relative to the master display image.
- Image layers may apply only "local" effects, affecting only immediate neighbors
- Layered images may be saved in a lossless 32-bit compressed file format called ELF* that retains all information about the image.
- Layers may be used as an "image barrel" source for brush painting operations
- Images of any size may be attached as layers; they may be the same size, larger, or smaller than the master layer image.
- You can zoom in (or out) on any layer independently of the rest of the image.
- You can open more than one view on any layer - even at different magnifications.
*ELF is an open file format. You can find details about it here: ELF Specifications
Beginning With Layers
 When beginning work with an image that you want to work with in a layered environment, you need to make an initial choice about the size of the master image. This doesn't affect what size layers you can use, but it does control the size of the final composite image. You can also change the size of the master at any time later using Enlarge, Reduce (with Replace Image on) and some geometric operations such as rotate and turn.
Layered images are created by promoting an atomic, or flat, image to a layered image. The promotion creates a master view of the same size as the original image, and a layer that contains the original image, set to normal mode. The result after the initial promotion, as viewed in the master image, is the same as the original atomic image.
You can either make a new image, or you can promote an image that already exists (one you loaded or have been working on already). When you do so, you are going to have the image contents (if any) as one of the layers, but it can be any layer, and you can also delete or simply detach it from the layered image later, should you decide that is what you want to do.
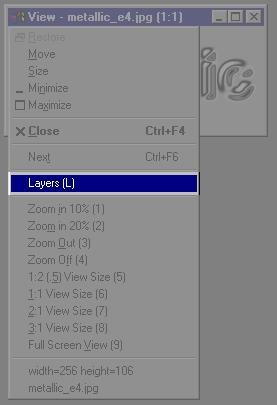
So to promote a normal atomic image to a layered image, either press the "L" key while the image view is active, or select Layers from the image's view system menu, available at the top left of the view. This is shown at the right.
When you do this, the image is converted as we described above and the Layers Dialog opens. The Layers Dialog is the control center for layered images. It is here that you can rearrange image layers, save layered images, change layer combination modes and more.
Tip: |
When the Layers Dialog is open, you cannot change the contents of any image. |
|
|
Note:

|
When working with both still images and the timeline, you need to keep the roles of the layers and the master image clear in your mind, and understand how a master image is created. Master images are created - completely rebuilt - every time they need to be redisplayed. Consequently, if you try and apply an effect to a master image, the effect will run, but immediately upon completion, when the image is prepared for display, WinImages F/x will re-create the master from the layers as a display process, and the effect is then lost.
The same thing happens if you try and use a master image as the action image in a timeline process; effects look like they are running (and in fact, they are), but nothing changes on output. The master is being rebuilt, so you can't actually generate a new result.
Since this occurs as a result of the actual process of re-displaying the image, you can get around it by selecting inhibit display in the timeline menu. This will allow you to use the master image as the action image, and the effects will work, because the contents of the master don't get updated. Remember, it is the act of displaying the master that causes it to be recreated from the underlying layers, so if you don't display it - it doesn't get rebuilt.
On the other hand, you can always use a master image as a source image or brush image, because that doesn't involve any change to the master. Similarly, you can use a layer as a source image, brush image or an action image; layers are mutable and will retain any changes you apply. Further, as the layers change, the master changes as well, and those changes can appear as a master is used as a source, as one of its layers changes.
If you'd like to work with a layered image in the timeline so as to create an animated result from the master image, here's what you need to do (using an example of changing one layer):
- In level one of the timeline, place the effect to be applied to the layer
- Adjust the effect trends, or drag different settings into the end of the timeline
- In level one, place and set the area selection
- In level one, select as the action image, the layer you want to affect.
- In level two, double click and select the master as the action image
- Generate the effect.
The result of the timeline is the master image, because it is the last thing, vertically, in the timeline frame (in level two.) Since the change to the layer update the master, and the master is the output, this is a good general approach. You can have as many levels, and so as many layer effects, as you like.
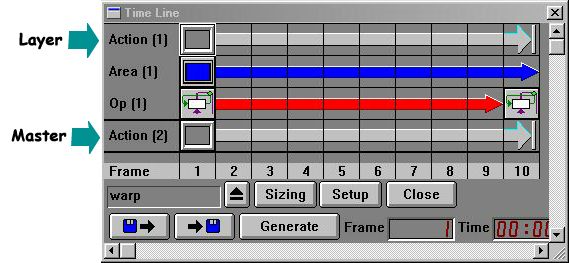
Here's what a short timeline looks like with just one layer of a layered image being changed (you only need to put the layers you're changing into the timeline):
Two-level timeline for working on layered image
|
Tip: |
You can quickly obtain an atomic (flat) image from a master by using the File / Clone Image command. The cloned master is flat, and so can take on all the normal roles of images in WinImages F/x. |
| |
|
Step by Step through the Layers Dialog
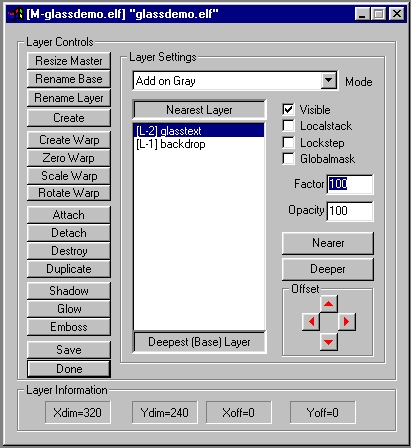
The Layers Dialog
Resize Master
This allows you to change the size of the resulting master image. When you create a layered file, the size of the master is taken from the image you promote; so if you promote a small image, you get a small master. Sometimes, this may not turn out to be what you wanted, or intended. Use this control to change the size of the master image to the size you desire. The master image size can be changed at any time. The only concern is that offsets of non-local layers are relative to the master, so they will move accordingly. You may have to reposition them if the change is not what you had in mind.
Rename Base
This allows you to rename the basename for all the layers. It does not change the filename of the master image or any layers. The basename is associated with all the layers, and saved in ELF layer files.
Rename Layer
This allows you to rename the layer selected in the layer list. It does not change the filename of the master image, but it does change the filename of the layer. This name stays with the layer in ELF files, and also will serve as the layer's filename if you save a layer as an atomic image (using Save or Save As in the File menu).
Create
This button creates a new layer. The layer will have the next available layer number. For instance, if you've created layers one and two, the new layer will be layer three. If you then delete layer two and create another layer, the new layer is still layer 4; layer numbers are never re-used within the same image. The new layer will be the same size as the master image size.
|
Tip: |
If you need to add a layer of a different size, then use the New Image tool in the File menu to make a new atomic image and then use Attach to add it to the layered image. |
|
Newly created layers are fully transparent, have a 100% opacity and are visible (although since they are empty and transparent, you won't see anything in them at this point.) They are initially placed at the deep end of the images layers, and they have no offset.
Create, Zero, Scale and Rotate Warp
Please See Legal Notice*
Create makes a new layer set to a geometric warping mode. A warp layer may contain a number of different types of warps, in billions of combinations. Warps are accurate to 1/64th of a pixel. The following layer functions are available in the layers dialog that directly affect warps:
- Zero Warp (remove all warping effect) The zeroing affects the entire warp layer.
|
Tip: |
If you take a layer in any other mode and change its mode to "warp", the resulting warp will be unpredictable because RGB and alpha data in the layer is not configured in any way that means anything in the context of a warp. In this case, you'll want to use Zero Warp immediately to place the warp layer into a known state (no warping.) |
|
- Scale Warp (enlarge or reduce effects - can only be applied once.)
Scaling may range from .0625 to any arbitrary amount. Scaling occurs in factored increments of 0.0625 of a pixel. The scaling affects the entire warp layer.
- Rotate Warp (rotation effects.)
Rotation may be any value; -180.0 to 180.0 is the effective, non-repetative range. The rotation affects the entire warp layer.
Most of the operations in the Geometric toolbar may be selectively applied to warp layers:
Plug-ins may affect warp layers if they are designed to. This capability has been made available to plug-in developers.
And finally, the Photo/Negative operation will perform a geometric reversal on the contents of a warp layer.
|
Tip: |
All operations that will work with Warp Layers are marked with a small green dot at the upper right of the operation's icon. Although the majority are in the Geom group, you will find others scattered about the program. |
|
Attach
Attach takes a loaded atomic image and adds it to the layered image at the deep end. You can then move it anywhere you like. The image is placed relative to the center of the master image. The image offset is used to accomplish this. Attached images have a normal mode, 100% opacity and are visible.
Detach
The currently selected layer is detached and becomes a normal atomic image. You can re-attach it later if you wish; no settings will be lost except offset.
Destroy
Destroy will detach a layer, and then delete the detached image.
Duplicate
Duplicate takes the current layer, duplicates it (are you surprised?) and attaches the duplicate at the deep end of the list. Mode, offset, visibility and opacity are all set to the same as the originating layer.
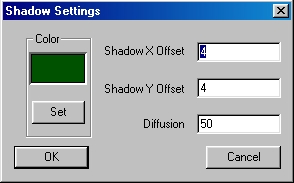
Shadow
The shadow button opens a dialog with some useful defaults. When you create a shadow layer, a number of simple steps are taken for you. You could do these manually as well, but the operation is so common we added it as a convenience. The layer that is created goes through the following steps:
- The layer is generated at the same size as the originating layer
- It is offset from the originating layer's offset by the offset amount in the shadow dialog
- It is set to multiply mode
- The mask of the selected layer is inverted and placed into the shadow layer as the shadow color, on white.
- A gaussian blur of an intensity selected in the shadow dialog's Diffusion control is applied
- The layer is moved to the next deeper position underneath the source of the shadow.

Here is an image with three shadow channels; cyan, magenta and yellow. This is the same effect you would get with red, green and blue spotlights over a white backdrop like this one. |
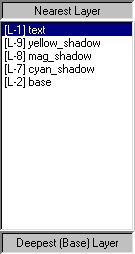
This is the layer list for this image. |
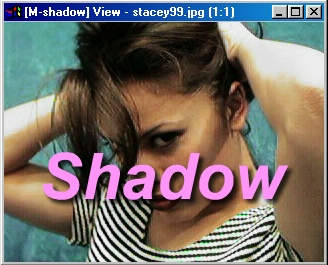
Black Shadow, Diffusion=50, Offsets=4, Opacity 75%
48-point Ariel, Bold Italic in lavender.
Glow
Glow works like the shadow generator; you select a layer that has an alpha mask, such as text generated into a transparent layer, and then press the Glow button.
The glow button opens a dialog with some simple defaults:
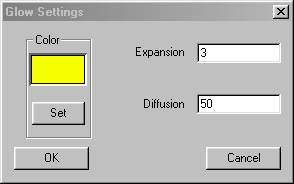
The Glow Dialog
When you create a glow layer, a number of actions occur:
- WinImages F/x locates the edges of the mask in the alpha channel of the layer you're using to generate the glow, and expands it by the number of pixels in the Expansion control into a new, temporary mask.
- It then generates a new layer that is black where the new expanded mask does not reach, and is the pure color of the glow elsewhere.
- It applies a gaussian blur of an intensity you specify in the Diffusion control.
- Finally, it sets the new layer to Brighten mode, and your glow is complete.
If the glow is the right color, but too strong, adjust the Opacity setting for
the glow channel.
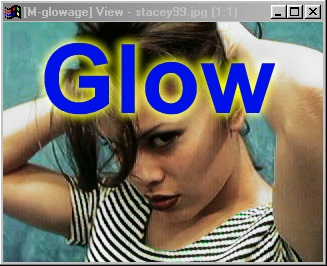
Yellow Glow, Diffusion=100, Expansion=3
Emboss
This allows you to create an emboss, or reverse emboss (a "punch") on an image as a layer effect. You have control over the depth of the effect and how soft or hard it appears.
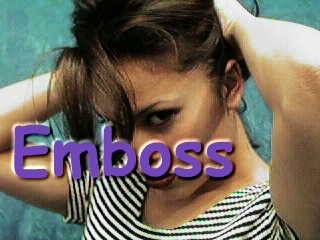
Diffusion=50, Intensity=5
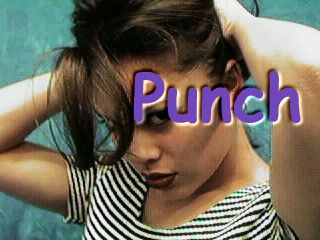
Diffusion=50, Intensity=5
Save
This allows you to save the entire layered image in a special type of image file called an Extended Layer File or Elf for short. These files are only recognized by WinImages F/x at this time. Elf files can be loaded from the normal File, Load Image MRU menus, and if you select any layer or the master of a layered image using Save As, you will be prompted as to whether you wish to save in ELF or in a normal (atomic) image mode.
Done
This button closes the layer dialog. You can reopen it at any time.
Layer Settings
The layer Settings portion of the dialog allow you to control the behavior of individual layers.
Layer List
Use the layer list to select the layer to change or examine settings.
Visible (Layer Disable)
This turns layer display in the master image on and off without changing any other settings. If the layer display is off, you have disabled the layer until you re-check this item - this is true for all types of layers. Note that a disabled layer may interfere with a local stack complex.
Localstack
This feature allows you to define layers that do not affect all layers below them; instead, layers that have the localstack flag turned on only affect the nearest layer below them that does not have the localstack flag turned on.
Lockstep
Lockstep allows you to cause image layers to move as one. When lockstep is on, selecting the lower layer (by clicking on it's title bar) and pressing the cursor keys in combination with shift and control will cause all the locked layers to move together. In this way, complex layer effects can remain attached to one another.
Globalmask
Globalmask allows any layer to mask beyond it's boundaries. For instance, if you have a text mask, if you move the text to a position over a texture where the texture looks like you want, but now the text mask does not completely overlay the texture, the texture will show around the edges of the mask. Turning on globalmask will force everything to be masked where the text mask does not cover the texture, eliminating the problem.
Opacity
This controls the amount of the layer mix with the master image layers underneath it.
Factor
Some layer modes have a "factor" that affects how the mode is applied. This adds an extra dimension of flexibility to these layer modes. In modes that have had factor added since the R5 release, setting factor to 100 will generate the same effect as the old, factorless layer mode.
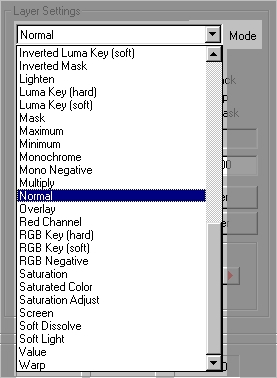
Layer Modes
Base and Control Layer for Examples
Opacity=100%, both layers visible
Alpha channel fully transparent at the bottom,
becoming fully opaque just above the middle. |
Modes List |
This controls how the selected layer is combined over the previously existing layers. Layer modes are enormously powerful and are worth spending considerable time experimenting and testing for effects. While some of the modes are reasonably conventional, others can cause wild and unexpected effects.
Quick Layer Mode Index
- Absolute Difference
- Add
- Add as Black
- Add as Cyan
- Add as Magenta
- Add as Yellow
- Add on Grey
- Behind
- Blue Channel
- Brighten
- Brightness Adjust
- Burn
- Channel Maximum
- Channel Minimum
- Color
- Contrast Adjust
- Darken
- Difference
- Dissolve
- Divide
- Dodge
- Dye
- Exclude
- Express
- Green Channel
- Grey Mask (blending function)
- Hard Light
- Hue
- Hue Adjust
- Hue Key (hard)
- Hue Key (soft)
- Hue/Saturation Key (hard)
- Hue/Saturation Key (soft)
- Inverted Grey Mask (blending function)
- Inverted Hue Key (hard)
- Inverted Hue Key (soft)
- Inverted Hue/Saturation Key (hard)
- Inverted Hue/Saturation Key (soft)
- Inverted Luma Key (hard)
- Inverted Luma Key (soft)
- Inverted Mask
- Inverted RGB Key (hard)
- Inverted RGB Key (soft)
- Lighten
- Logical AND
- Logical NAND
- Logical NOR
- Logical OR
- Logical XNOR
- Logical XOR
- Luma
- Luma Key (hard)
- Luma Key (soft)
- Mask
- Maximum
- Minimum
- Monochrome
- Monochrome Negative
- Multiply
- Normal
- Overlay
- Red Channel
- RGB Key (hard)
- RGB Key (soft)
- RGB Negative
- Saturated Color
- Saturation
- Saturation Adjust
- Screen
- Soft Dissolve
- Soft Light
- Value
- Warp
Nearer
This moves the selected layer towards the top, or near, end of the layer list.
Deeper
This moves the selected layer towards the bottom, or deep, end of the layer list.
Offset
These four buttons allow you to move the layer to any offset position. Clicking on the arrows moves the layer one pixel in the indicated direction. If you press and hold the shift key when you click the arrow button, the layer will move ten pixels at a time. To reset a layer to no offset (or to any specified offset), observe the offset positions in the Layer Information, discussed next. You can also reset the layer to no offset in a view by pressing the home key.
|
Tip: |
When the layer dialog is not open, you can move any layer by left-clicking once on the layer's titlebar, and then pressing any of the the left, right, up or down cursor keys on the keyboard. If you press shift and/or alt at the same time, the distance that the layer will move increases. |
|
Layer Information
X Dimension
This is the width of the currently selected layer.
Y Dimension
This is the height of the currently selected layer.
X Offset
This displays the horizontal offset of the currently selected layer.
Y Offset
This displays the vertical offset of the currently selected layer.
* Legal Status of Warp Layers
|
Warning:
 |
This original Black Belt Systems technology, Warp Layers, both concept and implementation, are in the process of being protected by a series of interlocking legal mechanisms. Black Belt Systems believes that Warp Layers are a completely new and original mechanism in image processing, and as a result, we expect to be granted appropriate rights to exclusive use of this technology. If the legal processes are as successful as Black Belt Systems hope them to be, the Warp Layers technology will be unavailable for other companies to adopt in any form without specific agreements with Black Belt Systems. This notice is posted to save all interested entities the annoyance and inconvenience of having to remove such implementations and/or pay legal fees involved with any attempt to defend such use. Should any entity find themselves interested in this technology, they should contact Black Belt Systems at sales in order to determine if it is possible to negotiate such an agreement. |
|
Page 27
WinImages F/x, WinImages Morph and all associated documentation
Copyright © 1992-2007 Black Belt Systems
ALL RIGHTS RESERVED Under the Pan-American Conventions
| WinImages F/x Manual Version 7, Revision 5, Level B |
HTML Documentation Management System © 1992-2007 Black Belt Systems