
| Quick Nav Bar | ||||||||
|---|---|---|---|---|---|---|---|---|
| << Previous | Contents |
Selection |
Op Index |
Parent | User Notes |
Index |
Glossary |
Next >> |
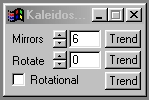
| a=KALEIDO(mirrors, ROTATIONAL, angle) |
| Items in CAPS are 0/1 switches or switches with more options than 0/1. |
|
The kaleidoscope operation uses mirrors and rotation to simulate the effect of an actual kaleidoscope. This kaleidoscope differs from an actual one in that you can adjust not only the rotational position of the mirrors, but also the total number of mirrors used. The operation can be animated by trending the Rotate parameter. This setting controls the position or initial angle of the mirrors. This operation also allows you to alter the way that the kaleidoscope functions. The first method, and the default, is to reflect the initial mirror to all of the other mirrors as reflections of the first mirror. The second method is to not reflect the image, but to copy the mirror slice to each of the mirrors. By turning the Rotational parameter on or off, you can control which method is used. Please review the examples below to see how the two methods differ.
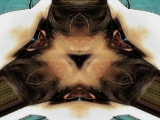 Normal Kaleidoscope |
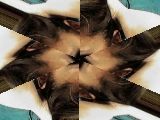 Rotational Kaleidoscope |
Trends
You will notice that all of the controls have a Trend button next to them. The trend button allows you to set that variable over a set of frames. Each frame of the animation can be thought of as a slice of time. The trends allow you to alter some, all, or none of the variables for a particular time slice. You will notice that the trend graphs have equidistantly spaced vertical lines. Each of these lines represents a frame in the animation. The number of frames can be altered using the Sequence controls... in the Timeline pull down menu. Animation lengths of 100 - 999 frames will be represented with a vertical bar being 10 frames, and animation length greater than 1000 frames will have a vertical bar for every 100 frames. Click here to view more information on Trends.
Mirrors
The Mirrors control allows you to adjust the total number of mirrors used by the kaleidoscope. The number of mirrors can range from 2 to 500, with a setting of 6 mirrors as the default. This setting will determine how many segments the area selection will be divided into. For each additional mirror added the total size of the mirrors will reduce. The section of the image that is reflected to the other mirrors is determined by the Rotate setting.
Rotate
The Rotate setting controls the section of the image that is reflected to the other mirrors. This setting can range from 0 to 360, with 0 being the default setting. This setting will determine where the initial mirror will be placed. For example, if the Rotate control is set to 0, then the initial mirror is located at the top of the area selection. If this value were changed to 90, the initial mirror would be located on the left hand side of the area selection. This continues for all values in a clockwise manner around the image. The size of the initial mirror is based upon the Mirrors setting. To produce a moving kaleidoscope simply trend this value from 0 to 360.
Rotational
This setting alters the way that the kaleidoscope works. If this option is selected, then the section of image specified by the rotate image will be reflected to each of the mirrors. The result is the traditional kaleidoscope image. If this option is not selected, then the initial mirror segment will be copied onto all of the other mirrors. This differs from the first method in that there is no true reflection from mirror to mirror. The example images above should help to clarify the difference.
| Quick Nav Bar | ||||||||
|---|---|---|---|---|---|---|---|---|
| << Previous | Contents |
Selection |
Op Index |
Parent | User Notes |
Index |
Glossary |
Next >> |
| WinImages F/x Manual Version 7, Revision 5, Level B |