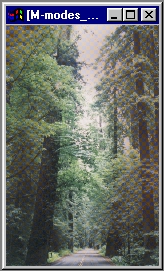
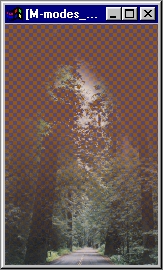
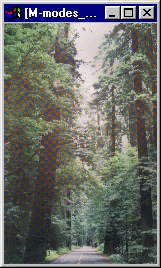
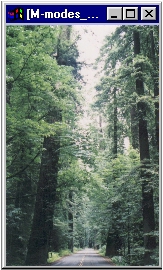
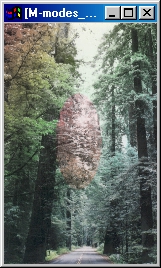
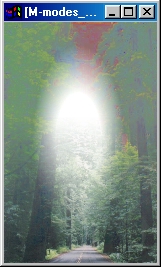
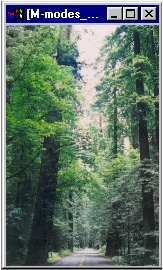
In Normal mode, images are composed above lower layers according to the color in the image, and the alpha channel information in the layer.
Normal Mode
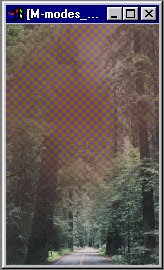
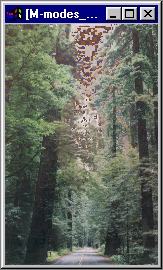
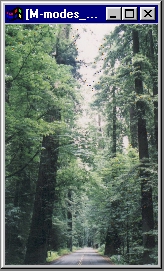
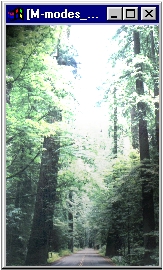
Behind is like normal layer mode in that it will apply the colors in a matte manner, except it will only produce results where the layer composite below is transparent, or partially transparent. The effect is to "protect" all pixel data already present in the layer composite before applying the pixel data in the behind mode layer.
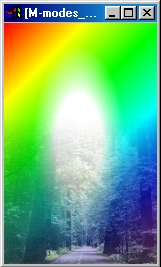
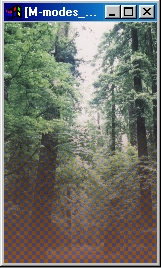
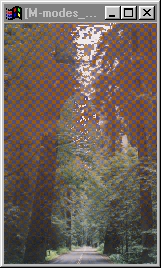
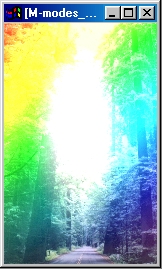
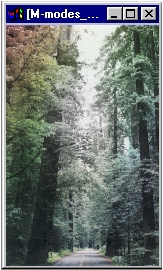
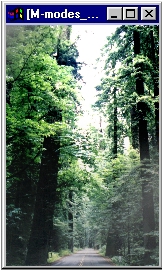
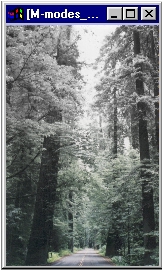
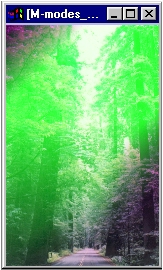
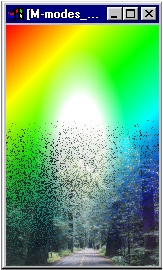
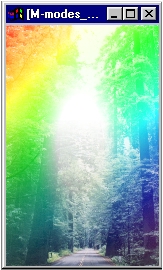
Where the layer is white, the layers below are converted to the monochrome average of their original colors. This operation obeys transparency. Colors other than white have interesting effects.
Monochrome Mode
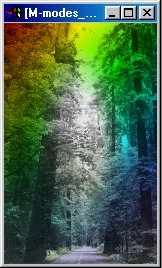
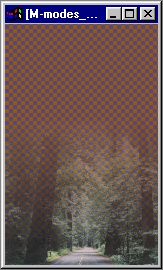
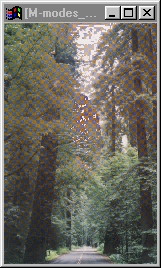
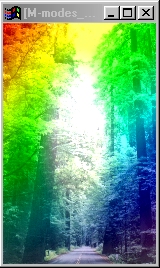
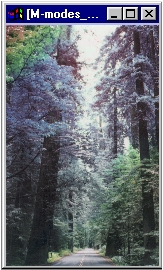
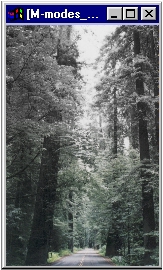
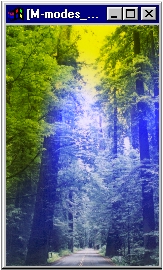
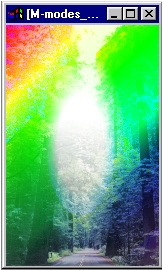
Where the layer is white, the layers below are converted to the B & W negative of their original colors. This operation obeys transparency. Colors other than white have interesting effects.
B & W Negative Mode
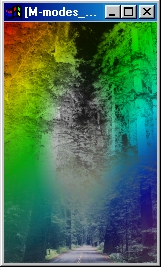
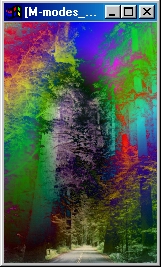
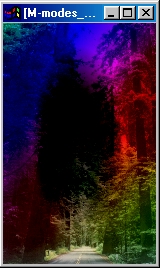
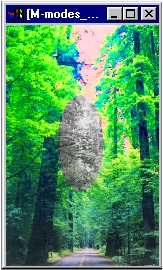
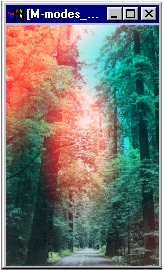
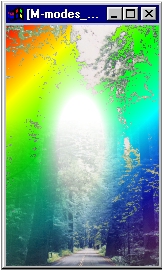
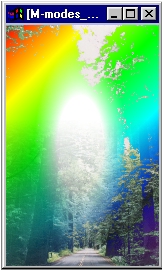
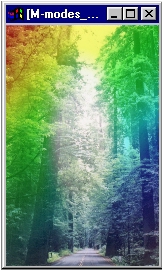
Where the layer is white, the layers below are converted to the color negative of their original colors. This operation obeys transparency. Colors other than white have interesting effects.
Color Negative Mode
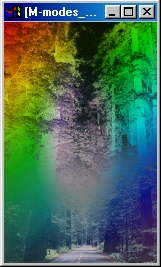
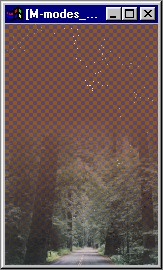
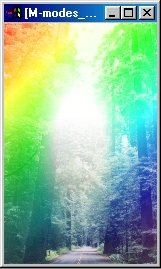
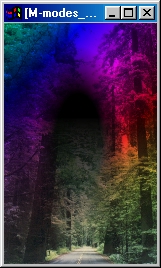
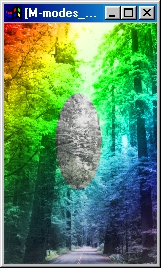
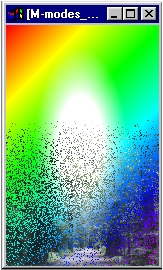
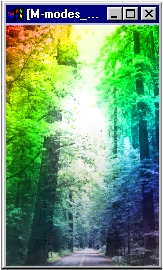
Where the layer is white, opacity is applied. Where the layer is black, transparency is applied. Grey levels smoothly change from opaque to transparent. If the image is not greyscale, but color, then the luma level of the color is used (Red X .3, Green X .59, Blue X .11)
Grey Mask Mode (since image is mostly bright, it is mostly opaque... however, over in the blue area, you'll see some transparency, as blue is not heavily weighted in the luma conversion.)
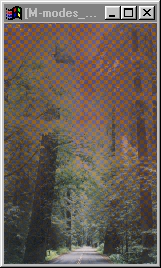
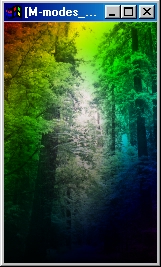
Where the layer is black, opacity is applied. Where the layer is white, transparency is applied. Grey levels smoothly change from opaque to transparent. If the image is not greyscale, but color, then the luma level of the color is used (Red X .3, Green X .59, Blue X .11)
Inverted Grey Mask Mode
Where the layer is opaque, opacity is applied. Where the layer is transparent, transparency is applied. Intermediate transparencies and opacities are applied directly. RGB information in the layer is ignored.
Mask Mode
Where the layer is transparent, opacity is applied. Where the layer is opaque, transparency is applied. Intermediate transparency or opacity is inverted, then applied. RGB information in the layer is ignored.
Inverted Mask Mode
In hard RGB key mode, full opacity is applied if the color in the layers below precisely matches the color in the keying layer. If there is any difference, the layer will key out to fully transparent.

Hard RGB Key Mode
In soft RGB key mode, full opacity is applied if the color in the layers below precisely matches the color in the keying layer. The more different the color is from the key color, the more transparency is applied.
Soft RGB Key Mode
In hard Hue key mode, full opacity is applied if the color in the layers below precisely matches the hue (of the HSV color space) in the keying layer. If there is any difference, the layer will key out to fully transparent.
Hard Hue Key Mode
In soft hue key mode, full opacity is applied if the hue in the layers below precisely matches the hue (of the HSV color space) in the keying layer. The more different the hue is from the key hue, the more transparency is applied.
Soft Hue Key Mode
In hard Hue and Saturation key mode, full opacity is applied if the hue and saturation in the layers below precisely matches the hue and satruation (of the HSV color space) in the keying layer. If there is any difference, the layer will key out to fully transparent.

Hard Hue/Saturation Key Mode
In soft hue and saturation key mode, full opacity is applied if the hue and saturation in the layers below precisely matches the hue and saturation (of the HSV color space) in the keying layer. The more different the hue and saturation is from the key hue and saturation, the more transparency is applied.
Soft Hue/Saturation Key Mode
In hard Luma key mode, full opacity is applied if the luma in the layers below precisely matches the luma (of the HSV color space) in the keying layer. If there is any difference, the layer will key out to fully transparent.
Hard Luma Key Mode
In soft luma key mode, full opacity is applied if the luma in the layers below precisely matches the luma (of the HSV color space) in the keying layer. The more different the luma is from the key luma, the more transparency is applied.
Soft Luma Key Mode
In Inverted hard Luma key mode, full transparency is applied if the luma in the layers below precisely matches the luma (of the HSV color space) in the keying layer. If there is any difference, the layer will key out to fully opaque.
Inverted Hard Luma Key Mode
In Inverted soft luma key mode, full transparency is applied if the luma in the layers below precisely matches the luma (of the HSV color space) in the keying layer. The more different the luma is from the key luma, the more opacity is applied.
Inverted Soft Luma Key Mode
In Inverted hard Hue key mode, full transparency is applied if the color in the layers below precisely matches the hue (of the HSV color space) in the keying layer. If there is any difference, the layer will key out to fully opaque.

Inverted Hard Luma Key Mode
In Inverted soft hue key mode, full transparency is applied if the hue in the layers below precisely matches the hue (of the HSV color space) in the keying layer. The more different the hue is from the key hue, the more opacity is applied.
Inverted Soft Luma Key Mode
In Inverted hard Hue and Saturation key mode, full transparency is applied if the hue and saturation in the layers below precisely matches the hue and satruation (of the HSV color space) in the keying layer. If there is any difference, the layer will key out to fully opaque.
Inverted Hard Hue/Saturation Key Mode
In Inverted soft hue and saturation key mode, full transparency is applied if the hue and saturation in the layers below precisely matches the hue and saturation (of the HSV color space) in the keying layer. The more different the hue and saturation is from the key hue and saturation, the more opacity is applied.

Inverted Soft Hue/Saturation Key Mode
In Inverted hard RGB key mode, full transparency is applied if the color in the layers below precisely matches the color in the keying layer. If there is any difference, the layer will key out to fully opaque.

Inverted Hard RGB Key Mode
In Inverted soft RGB key mode, full transparency is applied if the color in the layers below precisely matches the color in the keying layer. The more different the color is from the key color, the more opacity is applied.
Inverted Soft RGB Key Mode
This is the same as Difference, except that if the result is less than zero, then the results begin to increase again. This produces a very unusual result, and because the layer mode does extend beyond 0, we can fairly describe it as non-distorting. However, the results are so striking when this happens that you may have cause to think otherwise!
Absolute Difference Mode
In add mode, images are added to the lower layers according to the color in the image, and the alpha channel information in the layer. When a channel reaches 255, it stays there. This can result in some color distortions at high amplitudes where the sum would have been higher than 255 in one or more of the RGB color channels.
Add Mode
In Add on Gray mode, images are added to the lower layers according to the color in the layer as it differs from gray (127), and the alpha channel information in the layer. Where the layer is brighter than 127, in increases the brightness of the layers underlying it; where it is darker than 127, it reduces the brightness of the layers underlying it. Where it is 127, it causes no change.
This mode can produce glass-like effects quite easily. Like the normal Add mode, this limits excursions to 255, and to zero for values that are below 127 in the control layer.
See Also: Glass Text Tutorial using Layers
Add on Gray Mode
In difference mode, the contents of the layer are subtracted from the lower layers. When the result of the subtraction is less than zero, the layer is set to zero at that point. This can produce color distortions in some cases.
Difference Mode
This will use the whiteness of the layer to brighten the layers below it. This is a nondistorting mode.
Brighten Mode
This will use the brightness of the layer to darken layers below it. This is a nondistorting mode.
Darken Mode
|

In multiply mode, the layer is multiplied against the lower layers and the result is composed onto those layers. This is the mode typically used for shadows. White pixels will result in no change to the lower layers, a black pixel will change a lower layer to black, and a gray pixel will darken the color of the layers below. Colors in a multiply layer will have unusual and interesting effects. A yellow region will result in a yellow region on all layers below the multiply layer; multiply can never brighten an image, as full white results in the same output as the layer below. So anything other than white darkens the result, even when the multiply layer contains a full brightness version of one of the six primary RGB colors (red, green, blue, cyan, magenta, yellow), unless that color is directly over the same color in the layers below.
|
Multiply Mode
The opposite of mulitply. The layer is treated as a fraction from zero to one, as it goes from 0 to 255 in each channel. This has the opposite effect of multiply, that is, it lightens the image.
This applies the hue of the layer to the layers below it.
Color Mode
This applies the hue of the layer to the layers below it in a highly saturated manner.
Dye Mode
Like a soft version of absolute subtraction.
This lightens the layer composite.
This lightens the layer composite, like a gentler version of dodge.
This darkens the layer composite.
|
This applies the saturation of the layer to the layers below it.
Saturation Mode
This applies the luma of the layer to the layers below it.
This applies the hue of the layer to the layers below it.
This applies the hue and saturation of the layer to the layers below.
Saturated Color Mode
This applies the brightness of the layer (as value of HSV) to the layers below it.
One way to use this mode is to duplicate a colored image layer, then convert the duplicate to monochrome (using Standard/Monochrome), then set the duplicate layer to Luma mode. Position the luma layer above the color layer.
This will allow you to edit the luma and hue/saturation in two separate layers. This is particularly useful to sharpen the luma without producing color artifacts. See also luma layer mode, below.
Value Mode
This applies the brightness of the layer (as luma of HSL) to the layers below it.
One way to use this mode is to duplicate a colored image layer, then convert the duplicate to monochrome (using Standard/Monochrome), then set the duplicate layer to Luma mode. Position the luma layer above the color layer.
This will allow you to edit the luma and hue/saturation in two separate layers. This is particularly useful to sharpen the luma without producing color artifacts. See also value layer mode, above.
Luma Mode
This uses the luma level of the layer to adjust the brightness of the layers below it. Bright values increase the effect, dark values decrease the effect. A middle grey value (128) has no effect.
Brightness Adjust Mode
This uses the luma level of the layer to adjust the contrast of the layers below it. Bright values increase the effect, dark values decrease the effect. A middle grey value (128) has no effect.
Contrast Adjust Mode
This uses the luma level of the layer to adjust the hue of the layers below it. Bright values move the hue towards the green, dark values move the hue towards the red. A middle grey value (128) has no effect.
Hue Adjust Mode
This uses the luma level of the layer to adjust the saturation of the layers below it. Dark values decrease saturation, bright values increase saturation. A middle grey value (128) has no effect.
Saturation Adjust Mode
This mode translates the maximum of the R, G and B channels into monochrome.
Channel Maximum Mode
This mode translates the minimum of the R, G and B channels into monochrome.
Channel Minimum Mode
This mode replaces the red channel of the underlying layers. The other channels are unaffected.
Red Channel Mode
This mode replaces the green channel of the underlying layers. The other channels are unaffected.
Green Channel Mode
This mode replaces the blue channel of the underlying layers. The other channels are unaffected.
Blue Channel Mode
This mode presents the brighter of the layer, or the layer composite beneath.
Maximum Mode
This mode presents the darker of the layer, or the layer composite beneath.

Minimum Mode
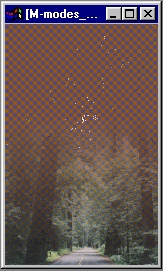
This mode uses the transparency level of the layer to apply transparency to the layer composite below. Transparency is either 100%, or else the image is 100% opaque. The more transparent the layer is, the more likely the pixel at that point is to be transparent. When a pixel is transparent, the RGB data from the image composite shows through. When it is opaque, the RGB data from the layer shows through.
Dissolve Mode
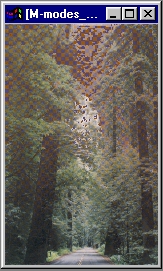
This mode uses the transparency level of the layer to apply transparency to the layer composite below. Transparency is either set to that in the layer, or else the image is 100% opaque. The more transparent the layer is, the more likely the pixel at that point is to take on the layer transparency. When a pixel is transparent, the RGB data from the image composite shows through. When it is opaque, the RGB data from the layer shows through.
Soft Dissolve Mode
When a Hard Light layer has white or black, it overpowers the layer composite beneath. Where the hard light layer approaches grey, the effect is reduced. At 50% grey (128 luma), there is no effect.
Hard Light Mode
Can be used to lighten overexposed images. It compares the layer and the sublayer composite, and outputs the brighter values. Handy to composite light objects (such as text) against a dark backdrop or midvalues.
Lighten Mode
Light areas in the layer are screened on to the sublayer composite, while dark areas in the layer are multiplied onto the sublayer composite. At 50% grey (128 luma), there is no effect.
Overlay Mode
Screen adds the layer to the sublayer composite. The result is limited to the maximum brightness of either the layer itself or the sublayer, whichever is brighter.
|
Screen Mode
You can use this layer mode to create the equivalent of the photographic acts of "dodging" and "burning." Dark areas on a soft light layer will dodge; Light areas will burn.
Soft Light Mode
Subtractive Color Space Layer Modes
The following four layer modes are designed to be used together with the results of the CMY and CMYK Separation commands in the File menu.
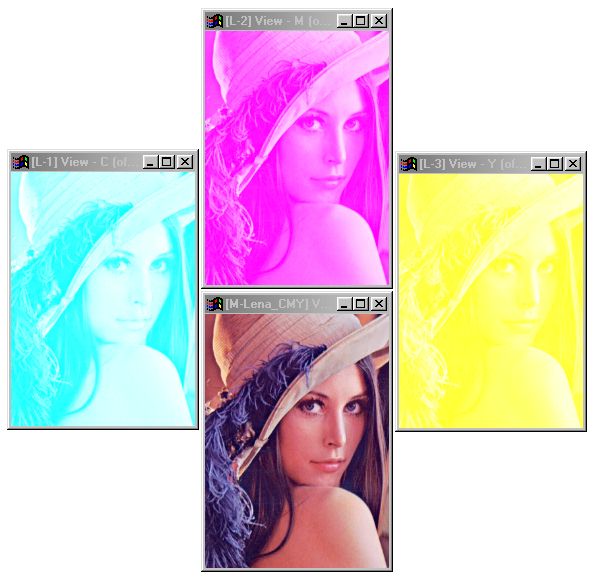
CMY separation and subsequent recombination using layers
This layer mode implements the subtractive color space component cyan.
This layer mode implements the subtractive color space component magenta.
This layer mode implements the subtractive color space component yellow.
This layer mode implements the subtractive color space component black.
Logical Layer Modes
These layer modes are bitwise layer modes. This means that for each bit in the layer that corresponds to a bit in the image layers below the layer, a logical operation is performed and the result for that bit only is the result of the logical operation.The most predictable effects, generally speaking, will result from placing entirely on and entirely off logical values (0 or 255) in the layer. So the colors black, white, red, green, blue, cyan, magenta and yellow, all constructed from the values either 0 or 255 in the R, G and B channels, will prove most controllable and repeatable.
You can use these modes to mask one or more channels on or off, and you can also use them to invert channels in a controlled manner.
Having said that, any color value has a known pattern of 1's and 0's, and so will produce repeatable and interesting, if not easily predictable, results. Try combining images using the various logical modes.
This layer mode implements the logical bitwise layer mode AND.
Bitwise Truth Table, AND:
| Layer | Image | Result |
|---|---|---|
| 0 | 0 | 0 |
| 0 | 1 | 0 |
| 1 | 0 | 0 |
| 1 | 1 | 1 |
This layer mode implements the logical bitwise layer mode NAND.
Bitwise Truth Table, NAND:
| Layer | Image | Result |
|---|---|---|
| 0 | 0 | 1 |
| 0 | 1 | 1 |
| 1 | 0 | 1 |
| 1 | 1 | 0 |
This layer mode implements the logical bitwise layer mode OR.
Bitwise Truth Table, OR:
| Layer | Image | Result |
|---|---|---|
| 0 | 0 | 0 |
| 0 | 1 | 1 |
| 1 | 0 | 1 |
| 1 | 1 | 1 |
This layer mode implements the logical bitwise layer mode NOR.
Bitwise Truth Table, NOR:
| Layer | Image | Result |
|---|---|---|
| 0 | 0 | 1 |
| 0 | 1 | 0 |
| 1 | 0 | 0 |
| 1 | 1 | 0 |
This layer mode implements the logical bitwise layer mode XOR.
Bitwise Truth Table, XOR:
| Layer | Image | Result |
|---|---|---|
| 0 | 0 | 0 |
| 0 | 1 | 1 |
| 1 | 0 | 1 |
| 1 | 1 | 0 |
This layer mode implements the logical bitwise layer mode XNOR.
Bitwise Truth Table, XNOR:
| Layer | Image | Result |
|---|---|---|
| 0 | 0 | 1 |
| 0 | 1 | 0 |
| 1 | 0 | 0 |
| 1 | 1 | 1 |
This layer mode allows you to apply geometric adjustments to the sublayer composite beneath. When a layer is set to warp mode, it's appearance changes to show the direction of the geometric effects that are contained within the warp. Warps are accurate to 1/64th of a pixel; this is sufficient to maintain accuracy with almost any imaginable combination of multiple warp layers. A single warp can divert each specific pixel in a layered image composite that underlies the warp (+) or (-) 2048 pixel locations maximum horizontally or vertically from its location in the sublayer composite below the warp layer. Multiple warp layers can add additional displacement to this range, as each warp in the stack has this displacement range, again, on the sublayers beneath.
There are two general ways to apply geometric effects to a warp layer. The first is to use the controls inside the layers dialog: Zero, Rotate and Scale. These controls allow you to easily affect the entire layer.
The second way is to use the operators in the toolbar that are marked with a small green indicator. Most of the operators in the Geom group are so marked, and there are a few others such as Negative and Plug-in. All of these operators can affect a warp layer similarly to how they affect a normal image.
|
Most geometric effects can be combined with one another in the same warp layer, with the exception of scaling. When scaling, multiple applications must be placed in separate warp layers.
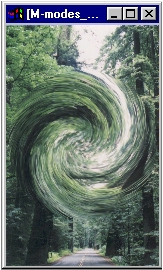
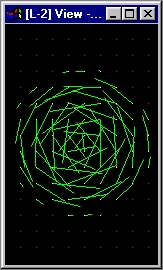
Warp Mode using warp layer at right