Page 42
Antialiasing On |
Antialiasing Off |
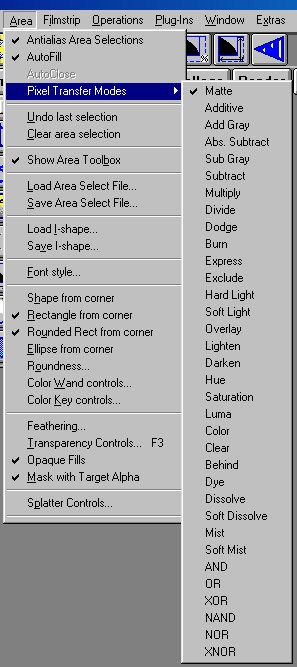
The Area Menu
Antialias Area Selections
When this is checked, drawn area selections are generated with sixteen times the accuracy of the normal selection. The extra precision is then used to "soften" the edges of the selection mask prior to applying an effect. The following area selection types are drawn selections that may be antialiased:
- Freehand
- Polygon
- I-Shape
- Rounded Rectangle
- Ellipse
- Polyarc
- Spline
- Bezier
- Font
Autofill
This causes area selections to be filled figures, when checked. Otherwise, area selections are a 1-pixel line or an antialiased 1-pixel line. This control is also available in the area toolbox.
Autoclose
This allows you to choose if area selections, when autofill is off, are open or closed. This control is also avilable in the area toolbox.
Pixel transfer Modes
This submenu allows you to select how pixel data is transferred to images and layers for operations that create pixel data. The following operations are considered to create pixel data within WinImages F/x:
- Color Fill
- Radial Fill
- Linear Fill
- Concentric Fill
- Outline Fill
- Texture
- Bang
- Flat Map
- Tiler
- Merge
- Place
- Stroke
- Plugin (plugins may, or may not, obey pixel transfer modes)
Please see This Page: "Color Transfer Modes" for more details on color transfer modes.
Undo Last Selection
This selection will undo the last area that was selected. This can be very useful when you are selecting multiple regions using the add area keystroke modifier, and would like to eliminate the last area that you selected. Once an area selection is undone, it can not be retrieved.
Clear Area Selection
This option will clear the current area selection from the image.
Show Area Tool Box
This control, when selected, will display the Area Selection Tool Box. If it is not selected, then the Tool Box will not be available. The tool box can also be opened or forced to the front by pressing the 'a' key, and the 'Shift A' key stroke can be used to close the area tool box.
Load Area Select File
The Load Area Select File control allows you to load a previously saved area selection mode. The file, which has a .ASF extension, will contain the area select mode, dimensions of the area select, and transparency information. These files can be altered using a text editor, but the addition of irrelevant or incorrect data in an edited file can cause the area select to not load. The loaded area select will only be applied to an image if the Redo area selection tool is selected. Area selection files can be used in lists to specify various area selects for multiple operation animations. Files are saved using the Save Area Select File option in this menu. It is important to remember that a loaded area select file is only valid for one use. This may have no consequence with area selection modes like ellipse and rectangle, but it can have a great effect with the Color Wand and color keyed tools.
Save Area Select File
This option allows you to save the current area select. The file will contain the area select mode, dimensions, and transparency information. These files can be altered using a text editor, but the addition of irrelevant or incorrect data in an edited file can cause the area select to not load. Area selection files can be used in lists to specify various area selects for multiple operation animations. You also have the option of simply saving area selects for future use. These area selects can be retrieved with the Load Area Select File option and the Redo area selection mode.
Load I-Shape...
The Load I-Shape.. Menu command allows you to load a previously saved I-Shape. The file, which has a .ISH extension, will contain the shape that is drawn using the I-Shape tool in the area toolbox. These files can be altered using a text editor, but the addition of irrelevant or incorrect data in an edited file can cause the I-Shape to not load, or load incorrectly.
Save I-Shape...
This option allows you to save an I-Shape. In order to do this, first outline the area that you wish to be an IShape using one of the area selection tools (preferably polygon). For example, if you wanted to create an IShape of North America, you would use the polygon tool to trace the coastlines of the continent.
After you have completed the shape, select the Save IShape option from the Area menu. After this has been selected you can then specify a name for your IShape and where it is to be stored.
Font Style
The Font Style requester allows you to select the font to be used with the Font Area Selection mode. The requester allows you to select the font type, font style, and point size of the font to be used. After selecting the desired font, style, and point size you may then select the OK button and enter the text to be used with the Font Tool. The color selection in the font requester has no effect on the font that is placed in the image. This dialog can also be accessed by right clicking over the Font area selection mode in the tool box.
Shape from Corner
This option allows you to toggle the IShape area selection from center to corner based area selections. Both methods work in the same manner, but have different anchor point (center or corner). If this option is selected, the area selection will be made using a corner anchor point. This means that the shape will "grow" from the initial mouse click which specifies the top left corner of the area selection. If this option is not selected, then the area selection will "grow" from a center anchor point. You can change this mode while making an area selection by holding down the ALT key while sizing the area. If you wish to return to the alternate mode, simply release the ALT button.
|
Note:

|
It is important to remember that WinImages F/x uses the center position of an area selection as the center of effect for many of the operations. |
|
Rectangle from Corner
This option allows you to toggle the Rectangle area selection from center to corner based area selections. Both methods work in the same manner, but have different anchor point (center or corner). If this option is selected, the area selection will be made using a corner anchor point. This means that the shape will "grow" from the initial mouse click which specifies the top left corner of the area selection. If this option is not selected, then the area selection will "grow" from a center anchor point. You can change this mode while making an area selection by holding down the ALT key while sizing the area. If you wish to return to the alternate mode, simply release the ALT button.
Rounded Rectangle from Corner
This option allows you to toggle the Rounded Rectangle area selection from center to corner based area selections. Both methods work in the same manner, but have different anchor point (center or corner). If this option is selected, the area selection will be made using a corner anchor point. This means that the shape will "grow" from the initial mouse click which specifies the top left corner of the area selection. If this option is not selected, then the area selection will "grow" from a center anchor point. You can change this mode while making an area selection by holding down the ALT key while sizing the area. If you wish to return to the alternate mode, simply release the ALT button.
Ellipse from Corner
This option allows you to toggle the Ellipse area selection from center to corner based area selection. Both methods work in the same manner, but have different anchor point (center or corner). If this option is selected, the area selection will be made using a corner anchor point. This means that the shape will "grow" from the initial mouse click which specifies the top left corner of the area selection. If this option is not selected, then the area selection will "grow" from a center anchor point. You can change this mode while making an area selection by holding down the ALT key while sizing the area. If you wish to return to the alternate mode, simply release the ALT button.
Roundness
This control allows you to specify the percentage of roundness for the Rounded Rectangle area selection mode. The control ranges from 0% roundness (a rectangle) to 100% roundness (an ellipse). The default of this control is 50% roundness. This control can also be accessed by right clicking over Rounded Rectangle icon.
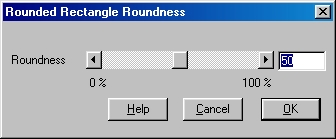
Roundness Dialog
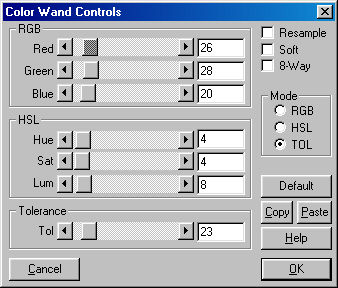
Color Wand Controls
The Color Wand dialog allows you to specify the variance that is to be used for the Color Wand area selection mode. It is important to remember that with 24-bit images a variance must be specified for color fill modes. The variance specifies the allowable amount of change in the RGB or HSL values that are to be used to determine the area. This dialog contains seven separate sliders for controlling the variance of Cubic RGB, Radial RGB, or Cubic HSL colors. This information is used to determine which areas adjacent to the initial click of the color wand will also be selected. Increasing and decreasing the variance controls will result in more area or less area being selected by the color wand. Resample tells the wand to pick up the new color at each location, which results in extremely sensitive wand operations. Soft tells the wand to generate an alpha value that is proportional to the degree of difference between the sample that is the root of the fill, and the pixel being filled. 8-way tells the wand to expand diagonally, as well as in the traditional north, south, east and west directions. These controls can also be accessed by right-clicking over the Color Wand icon in the Tool Box. See
this page for more detail on the color wand.
Color Key Controls
The Color Key dialog allows you to select a keying modifier for your area selections from the following types:
- Key on RGB (Red, Green and Blue)
- Key on HSV (Hue, Saturation and Value)
- Key on Colorspace (18-bit or 24-bit)
- Key on Steepness (0=flat, 255=vertical)
- Key On Height (0=low, 255=high)
As you select any of these options the controls will be altered to suit the key type selected. For example, if you select RGB as the key mode, the key color selection and RGB variance controls will be available.
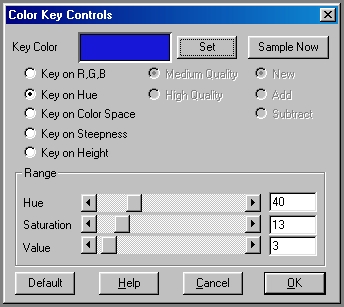
Color Key Dialog (using HSV)
The remainder of the dialog is devoted to specifying options and setting for the three keying modes. All three modes allow you to select any of the predefined colors or specify your own color to be used for color keying. The specified color and variance are then used inside the area selection to select the desired colors. These colors are selected on the basis of the initial area selection (boundary), the key color, and any associated variance. After all of this has been determined, WinImages F/x will outline the area and perform the operation on only areas which contained the specified colors.
The Steepness and Height keying modes are designed to be used with heightfield textures and the landscape operators. They allow you to easily control what altitudes (or degrees of slope) an effect is applied to. Since a heightmap is interpreted with 0 as the lowest altitude and 255 as the highest altitude, this can be very useful.
For instance, if you watched to "roughen" a landscape, and you know you plan to flood it with water at an altitude of 32, then you might prefer not to roughen the landscape from 0 to 32 (because it would be underwater, and so not subject to the same environmental forces). To accomplish this, you could set the height key to lo=33 and high=255, then apply a dither operation to the resulting area from the key and the Entire Image area selection. Nothing below 33 would be affected, but the landscape above the planned water level would be roughened.
Similarly, Steepness keying can be used to apply effects to areas of low slope (for instance, a steepness key of lo=0 high=5 would apply an effect to gentle slopes) or to high slope regions (lo=5 hi=255 would do that). Steepness keying is also intended to be used with heightfields, though of course you can use it for anything you may think of!
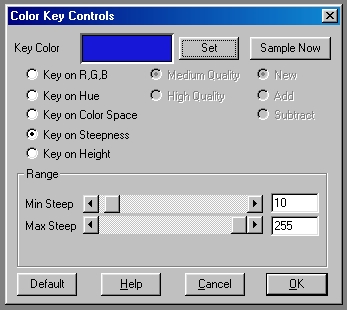
Color Key Dialog (using Steepness)
Key on Color Space is handled differently from the other two keying modes. We'll explain the difference here.
RGB and HSV keying use a conventional, "central" color to key. You can then expand the key to also select colors that are near (in terms of a sphere in conventional RGB or HSV colorspaces) to the original key color. This means that colors in all directions are chosen, and if your key is not particularly uniform, as the keying range is expanded, colors can be included in the key that you don't want.
Color space keying builds an 18-bit or 24-bit colorspace that knows about every color in the area selected to set up the key. Not one central color, but hundreds, thousands - even millions of distinct colors. This means that the key precisely matches every color in the that region - not colors "near" them, or made of an average as must be done with RGB or HSV keying.
Once you have created a colorspace key, you can grow the colorspace key so that colors near all of the keying colors are also included. Because colors around all of the key colors are added, growing the key just slightly serves to increase the key application to the key colors in an extraordinarily accurate manner.
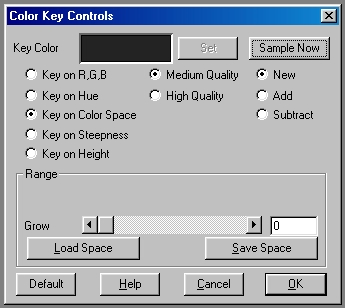
Color Key Dialog (using medium colorspace)
Each control in the dialog is described below in greater detail:
Key on: RGB, Hue, or Color Space
This control allows you to select the color key method that you will be using for the key selection. You may select an RGB based key, and Hue based key, or a color space key. By selecting any of these options the dialog will automatically change the controls to the proper settings for that key mode.
Medium/High Quality
This control alters the quality of the color key space. A medium quality space will produce fairly good results with low memory usage (about 1/4 megabyte), and a high quality space will produce excellent results with considerably higher memory requirements (about four megabytes). It is possible to change from one quality of key space to the other at any time, but their will be some minor reduction in quality when you switch from high to medium. These options are only available of the Key on Color Space option is selected.
New/Add/Subtract
These controls allow you to specify how the next sample area will be used by the key color space. You can select to Add the new colors to the current color space, subtract the new colors from the existing space, or create a new color space. These options are only available if the Key on Color Space option is selected.
RGB/HSV Range
These two sets of slider gadgets allow you to specify the specific RGB or HSV ranges for a RGB or Hue based color key. Please review the above documentation and the documentation in Color Key section for further details on how color ranges influence a color key area selection. These options are only available if the Key on RGB or Key on Hue selection has been made.
Grow
The Grow slider allows you to increase the range of a color within the key color space. For example, if you have a key space comprised entirely of pure blue (0,0,255) and you grow the color space by 10, your new space would include colors from (0,0,255) to (10,10,245). It is important to remember to reset this control to 0 if you are going to make further adjustments to the color space. If you do not, the program will continue to grow the color space by the specified value each time it is used. This option is only available if the Key on Color Space option is selected.
Load/Save Space
These controls allow you to load or save a color space to file. Once the color space has been saved, it can be recalled and used by selecting the load space button in this dialog.
|
Note:
|
When you use a high quality colorspace, the file sizes for the color key can be as large as four megabytes. The colorspace files do use compression, and most files won't be anywhere near that size, but you should be aware that it is possible. |
|
Feathering Controls
Area selections are automatically feathered, or softened, if this setting is non-zero. Feathering affects the entire area selection, and extends both into the selection and past the selection. The setting is in tenths of pixels, so the range of 0 to 200 represents 0.0 to 20.0 pixels in 1/10th pixel steps. The larger the feather distance, the longer the area selection will take to calculate.
Feathering may also be adjusted within the
details area dialog available from timeline area selection icon dialogs.
Finally, there are a number of useful scripting commands that control area selection feathering and other area selection features.
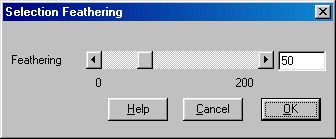
Feathering Control Dialog
Transparency Controls
The Transparency controls are used to specify the amount of transparency and edge blending level. The Transparency is the amount that a source, alpha channel, or even an effect will show through the current or action image. The edge blending percentage is the amount of allowable blending on the edge of the area select.
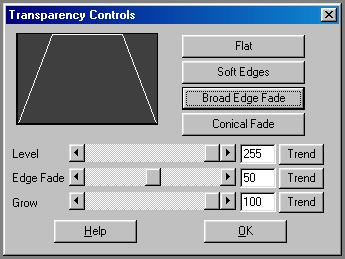
Transparency Control Dialog
Transparency level slider
This allows you to specify the transparency as a value that ranges between 0 and 255. A setting of 0 will result in the effect being completely transparent, and a setting of 255 will make the effect opaque. The specified transparency level will be applied to all of the effects in WinImages.
Edge Blending control
This allows you to specify the percentage value of the entire area select that is to be used for edge blending. The control can range from 0% to 100%, and effects the horizontal slope of the graph. A setting of 0% will result in there being no edge blending, and a setting of 100% will result in an edge blend that extends from the edge of the area select to the center. You can also perform an anti-aliasing operation by setting this control to 1%. This setting will not perform a true edge blend.
Preset Edge Blends
There are several preset edge blending levels. These presets are: Flat, Soft Edges, Broad Edge Fade, and Conical Fade. The Flat preset has an edge blending percentage of 0% which will simply place the effect in the selected area with no blending. Soft Edges will perform an anti-aliasing at the edge of the area select. The Broad Edge Fade has an edge blending level of 50% that produces a nice fading effect. Conical Fade has 100% edge blending.
This dialog also contains a control to alter the width of the area selection. This means that you can specify exactly where the edge blending is to begin. The control ranges from 0 to 100%, and effects the width of the transparency graph. For example, a setting of 50% would result in the edge blending beginning 50% into the area selection. It is important to remember that image information outside of this radius will be lost.
There are also trend graphs for each of these transparency modifiers. Setting the trends for an operations will allow you to create effects that fade in and then fade out or even transitions from one image to another. The trend button allows you to set that variable over a set of frames. Each frame of the animation can be thought of as a slice of time. The trends allow you to alter some, all, or none of the variables for a particular time slice. You will notice that the trend graphs have equidistantly spaced vertical lines. Each of these lines represents a frame in the animation. The number of frames can be altered using the Sequence controls... in the Timeline pull down menu. Animation lengths of 100 - 999 frames will be represented with a vertical bar being 10 frames, and animation length greater than 1000 frames will have a vertical bar for every 100 frames.
Mask with Target Alpha
This control, when selected, will force all of the masking to be masked by existing alpha channels in an image or layer.
Normally, this should not be selected unless you want the alpha channel to interact with the selection mask.
Opaque Fills
This menu selection has been made obsolete for almost all possible uses by changes in WinImages F/x's internal mechanisms for generating color as of R7.01[a]
Normally, this should not be selected.
Splatter Controls
These are documented Here
Page 42
WinImages F/x, WinImages Morph and all associated documentation
Copyright © 1992-2007 Black Belt Systems
ALL RIGHTS RESERVED Under the Pan-American Conventions
| WinImages F/x Manual Version 7, Revision 5, Level B |
HTML Documentation Management System © 1992-2007 Black Belt Systems