Timeline Area Selection Dialog
| Quick Nav Bar | ||||||||
|---|---|---|---|---|---|---|---|---|
| << Previous | Contents |
Selection |
Op Index |
Parent | User Notes |
Index |
Glossary |
Next >> |
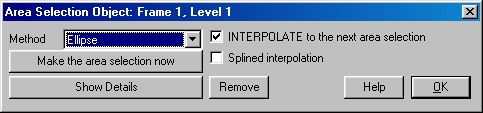
Method
The method drop down box allows you to alter the current area selection method. The method box will display the area selection method that was initially selected for that key frame. This area selection method can then be changed to another area selection type by selecting a new method from the drop down box list. Changing the area selection mode in this manner will also change the actual area selection mode that will be used, and the icon that is displayed in the timeline. You can elect to make the area selection at this time by selecting the Make the area selection now option. This will bring the last action image to the front. You can then select the desired region for application of the operation. If you do not elect to make the area selection at this time, the last area selection that was made will be used for that key frame. This means that regardless of where or when the last area selection was made, the effect will be applied in that area. This would allow for application of an effect in several separate locations in the image, many of which you may not have wanted. You will almost always want to avoid this type of situation by making the area selection before generating the Time Line.
Interpolate
The interpolate option allows you to have the current area selection interpolate into the next area selection that is encountered for this level of the time line. Interpolation means that the first area selection will modify its shape to become the second area selection. For example, you could interpolate a rectangular area selection into an elliptical area. This also allows you to alter an area selection position over time. If the rectangle and the ellipse area selections in the above example were made in separate locations in the image, then WinImages F/x would not only interpolate the shape of the area selection, but also the position of the area selection. If this control is not selected, the area selection that is made will remain in the same shape and position until another area selection is encountered for that level, or the end of the sequence is reached. Area selection interpolation is available between font styles or text strings, but the interpolation is based on the exterior outline of the fonts and text. For example, you could interpolate between a text string of The Beginning in an Arial font to The End in a Courier font, but only the outline of the text and font style would be used. This would result in the outside edges slowly changing into the next key frame. For a more accurate type of font interpolation, you could produce a morphing sequence in WinImages Morph. The morphed sequence could then be merged into the sequence that you are creating in WinImages F/x. The interpolation option will always default `to the "on" position.
|
Make the Area Selection now
This button, when pressed will allow you to make the area selection for the current key frame. This area selection is then saved for use in the time line sequence. WinImages F/x will automatically bring the last Action image to front. At this point you should make the area selection. The area selection will be scaled to fit any resolution image that is used in the sequence. Making the area selection will close this dialog, but it can be re-opened after the area has been selected. After an area selection is made, it is then associated with that key frame and level. If you wanted to view more information on the area selection that you made, you could open the Show Details dialog. This dialog will give a full description of the area selection including size, center position, transparency, and other related information. You have the option of altering these settings to more specific values, or simply leaving them alone. The Show Details dialog and controls are discussed in further detail below. You should consider always making an area selection for each key frame. If you do not make an area selection for a key frame, the last area selection that was made will be used for that frame. This can lead to highly undesirable results in your animation sequence.
|
Delete
This option will delete the area selection from the time line. You then have the option of replacing the area selection with another selection method from the tool box, or having no associated area selection for the operation. If there is no area selection associated with an operation, the last selected region will be used as the area selection. You can avoid this by simply altering the Method control to display the desired area selection. WinImages F/x will automatically interpolate any previously associated area selections to fit the selection mode. You always have the option of re-selecting the region by pressing the Make area selection now button. Once an area select is deleted, all of the area selection information is lost.
Splined Interpolation
This option allows you to select how area selections will be tweened by the program. If this option is selected, the program will create a spline (curve) based path between the area selections. If this option is not selected, a linear path will be used to interpolate between the area selections. We suggest that you may want to use Splined Interpolation for all area selection key frames in a level, but it is not required.
Show Details
The Show Details option will access the Detailed Area Selection controls. These controls are used to alter or specify specific details for an area selection. Included in this dialog are controls to manipulate the area selection size, center position, transparency, and other area selection values. It is important to remember that these are considered to be advanced controls, and they should not be manipulated by a novice user. All of the controls and options for this dialog are documented below in the Detailed Area Selection Controls section.
The Detailed Area Selection Dialog allows you to fine tune specific settings for an area selection. This dialog is accessed by pressing the Show Details button in the main area selection dialog. The controls in this dialog can be used to alter and control all aspects of an area selection including its size, center position, and transparency level. Each area selection mode has different adjustable details. For example, The Color Key area selection modifier will access different option than the Font area selection method. Only the controls which apply to the current area selection method will be displayed. All other controls will appear ghosted, and can not be manipulated. You can alter the area selection type by selecting the Method option. If no area selection has been made for this key frame, the Make the area selection now control allows you to select a region on any of the currently loaded images. All of the controls for this dialog are detailed below.
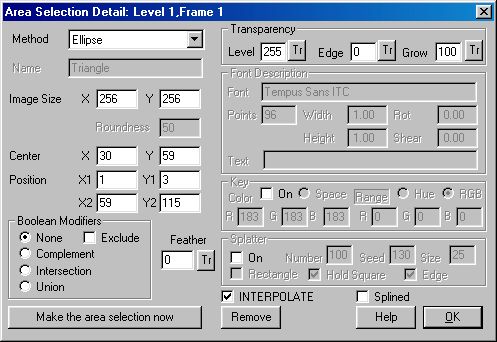
Method
The method drop down box allows you to alter the current area selection method. The method box will display the area selection method that was initially selected for that key frame. This area selection method can then be changes to another area selection type by selecting a new method from the drop down box list. Changing the area selection mode in this manner will also change the actual area selection mode that will be used, and the icon that is displayed in the timeline. You can select to make the area selection at this time by selecting the Make the area selection now option. This will bring the last action image to the front. You can then select the desired region for application of the operation. If you do not select to make the area selection at this time, the last area selection that was made will be used for that key frame. This means that regardless of where or when the last area selection was made, the effect will be applied in that area. This would allow for application of an effect in several separate locations in the image, many which you may not have wanted. You will almost always want to avoid this type of situation by making the area selection before generating the Time Line.
Name
The Name control is a simple informational area that allows you to see the nameof the currently loaded IShape. You can not alter this name from this dialog. If you want to change the IShape that is to be used for this key frame, then you will need to use the Load IShape control from the ToolBox.
Image Size
This control will display the size of the image that this key frame's area selection was made on. This value is then used to scale the area selection up or down based on the size of the actual action image or images. For example, if the area selection was made on an image that was 320 by 200, this value would read 320 by 200. The area selection associated with this key frame, and made on the 320 x 200 image would then be scaled to fit any size action image that was specified in the time line. Due to the fact that this value is used to resize the area selection for any size action frames, it is strongly suggested that you do not alter this value. Doing so could result in area selections that are not properly scaled for the selected action frames.
Roundness
The roundness control displays the amount of roundness that was set for the Rounded Rectangle area selection method. The roundness value that is displayed here will be the roundness value that is set in the Area menu's Roundness... option. For example, if the roundness control is set to 20%, then this control will read 20. You can alter this control to any roundness percentage that you like, but it will change any area selections that have already been made for this key frame. The area selection will be modified to reflect the new roundness setting. This option is only available for the rounded rectangle area selection method. If you have any further questions on this area selection method, please refer to Section 5.1.5 for more information.
Center
The center position numeric entry fields will display the current center of the area selection that is associated with this key frame. If no area selection has been made for this key frame, then this control will default to 320 by 320. If you select the Make the area selection now button and make an area selection, then the center control will display the center of that area selection. The center control is available for all area selection modes in WinImages F/x. You can also alter the center value of the area selection by simply entering the desired X and Y image coordinate values into the numeric entry fields. This can be particularly useful for slight adjustments to the placement of an area selection, or for altering the center position for a center based operation like Radial Wave. Altering this value after an area selection has been made for this key frame will result in a change in the area selection made for the sequence. Note: Any erroneous or illegal value entries will be automatically reset to 0.
Position
The position controls (X1, Y1, X2, and Y2) will display the X and Y image coordinates for an IShape, Rectangle, Rounded Rectangle, Ellipse, Numeric Rectangle, and Font area selection modes. These coordinates are not available for Freehand, Polygon, Poly-arc, Spline, Bezier Curve, Color Wand, Entire, or Redo. If an area selection has not been made for the current key frame, then the coordinate values will default to the entire image size. For example, if the Image Size control is set to 320 by 200, then the default position is X1=0, Y1=0, X2=319, and Y2=199. After an area selection has been specified for this key frame, the position values will display the X and Y extreme position values. X1 will specify the top of the area, Y1 will specify the left-hand side of the area, X2 will specify the bottom, and Y2 will specify the right-hand side. The Font area selection method is lightly different. It will only use X1 and Y1 to specify the origin point for the text string. It will not use the X2 and Y2 values, and they will not be available. It is important to remember that these are extreme values, or the edge points of the area selection. These values can be altered to make an adjustment to the size of the area selection, or to alter the area selection position. Altering this value after an area selection has been made for this key frame will result in a change in the area selection made for the sequence. Note: Any erroneous or illegal value entries will be automatically reset to 0.
Boolean Modifiers
The Boolean Modifiers allow you to specify specific area selection modifiers to a key frame area selection. These modifiers are located at the bottom of the area selection ToolBox, and include Complement, Intersection, Union, and Exclude. These modifiers can be added to an area selection by using the drag and drop method, or by selecting them through this dialog. This allows you to create complex area selection that are based on previous area selections. In WinImages F/x a Time Line level does not need to contain an operation. It can instead contain only an area selection. For example, if you wanted a cutout of the word End to appear inside of a solid filled ellipse, you would set the first level of the time line to a Font area selection only. The second level would contain an Ellipse that has Complement control selected, and color fill as the operation. You can specify the complement modifier by turning it on before you place the icon, turning it on before you select the area, by dragging the complement icon to the desired key frame, or by turning it on in this dialog. The final time line would look like this:

The same is true for all of the modifiers in WinImages F/x including union, intersection, and exclude. The use of these modifiers can aid in the creation of complex and unusual area selections.
Feather
This control allows you to specify post-selection feathering. If you set a trend, the trend will control the feather; otherwise, feathering will be interpolated between different area selection settings. The feather setting is 10x the distance in pixels, and may be set from 0 (no feathering) to 200 (20.0 pixels.) Feathering extends 1/2 the distance into the area selection, and 1/2 the distance past the area selection. Feathering affects the entire area selection.
Make the Area Selection now
This button, when pressed will allow you to make the area selection for the current key frame. This area selection is then saved for use in the time line sequence. WinImages F/x will automatically bring the last Action image to front. At this point you should make the area selection. The area selection will be scaled to fit any resolution image that is used in the sequence. Making the area selection will close this dialog, but it can be re-opened after the area has been chosen. After an area selection is made, it is then associated with that key frame and level. If you wanted to view more information on the area selection that you made, you could open the Show Details dialog. This dialog will give a full description of the area selection including size, center position, transparency, and other related information. You have the option of altering these settings to more specific values, or simply leaving them alone. The Show Details dialog and controls are discussed in further detail below. You should consider always making an area selection for each key frame. If you do not make an area selection for a key frame, the last area selection that was made will be used for that frame. This can lead to highly undesirable results in your animation sequence.
|
Transparency
The Transparency controls allow you to alter the transparency and blending level of the area selection over the sequence of frames. The transparency controls consist of three separate values: Level, Edge, and Grow. These values and their interrelations are discussed in Section 5.1.5 under Transparency Controls. These controls specify how the area selection will be placed in the action image. The Level control deals with the transparency level, or opaqueness, of the area selection. The Edge control is used to specify the amount of edge blending, or gradual transparency, for the area selection. The Grow control is used to specify the effective size of the area selection as a percentage value. Each of these values can be trended over the sequence of frames by selecting the associated trend button. This allows you to create effects that fade in and out, or fade to a center point and then disappear. The trend graph that is present will be the same length (number of frames) that the area selection is valid. Remember an area selection remains valid until a new area selection is encountered on the same level, or the end of the sequence is reached. For example, it is possible to trend the Level value so that an effect would fade in over the first five frames, and then fade out over the last five frames. A further explanation of trends is available in any of the operation documentation sections.
Font Description
The font controls allow you to adjust every aspect of a font area selection. The font controls include the font name, point size, width, height, rotation, shear, and the text that is to be used for the area selection. If you alter the font name or type, WinImages F/x will automatically find the font type on your system that is closest alphabetically to the name you entered. This change will be reflected in the final output of the font. It is important to remember that interpolating fonts with other area selection, or one font style into another can produce unexpected or undesirable area selections. This is due to the complex nature of fonts. Interpolation of fonts, and other complex areas, uses an outline interpolation. This means that the basic outline of the first area will be interpolated into the basic outline of the next area selection. If you want to create an effect where one font style or text string changes into another font style or text string, you should use WinImages F/x to create a morph sequence that alters from one style to the next. The other controls allow you to alter the size, shear, and rotation values for the font area selection. Adjusting any of these values will alter the area selection file that is associated with this key frame.
Key Color
This control allows you to specify the key color (Color Key only), and the key color range (Color Key and Color Wand). There are also options to specify a color selection based Hue, Saturation, and Luminance values or a complete color space instead of the default RGB settings.
These controls allow you to make slight adjustments to your color keyed or Color Wand area selections. The key color controls are used for the Color Key area selection only. The range controls (at the right) are used to specify the color range or variance for both the Color Key and Color Wand area selection modes. Adjusting any of these values can significantly alter the area that is selected.
Splatter
The Splatter controls allow you to manipulate the Splatter area selection modifier, and its associated controls. The Splatter modifier will produce multiple sub-regions within the main area selection, and then apply the selected operation in those sub-regions. This allows you to create random star fields, domes, or merges. You have the option of turning splatter on or off, altering the total number of splatters, altering the maximum splatter size, and changing how the sub-regions will be created. Altering the Seed value will significantly change where the sub-regions occur and their size.
Interpolate
The interpolate option allows you to have the current area selection interpolate into the next area selection that is encountered for this level of the time line. Interpolation means that the first area selection will modify its shape to become the second area selection. For example, you could interpolate a rectangular area selection into an elliptical area frames. This also allows you to alter an area selection position over time. If the rectangle and the ellipse area selections in the above example were made in separate locations in the image, then WinImages F/x would not only interpolate the shape of the area selection, but also the position of the area select. If this control is not selected, the area selection that is made will remain in the same shape and position until another area selection is encountered for that level, or the end of the sequence is reached. Area selection interpolation is available between font styles or text strings, but the interpolation is based on the exterior outline of the fonts and text. For example, you could interpolate between a text string of The Beginning in an Arial font to The End in a Courier font, but only the outline of the text and font style would be used. This would result in the outside edges slowly changing into the next key frame. For a more accurate type of font interpolation, you could produce a morphing sequence in WinImages F/x. The morphed sequence could then be merged into the sequence that you are creating in WinImages F/x. The interpolation option will always default to the "on" position.
|
Delete
This option will delete the area selection from the time line. You then have the option of replacing the area selection with another selection method from the tool box, or having no associated area selection for the operation. If there is no area selection associated with an operation, the last selected region will be used as the area selection. You can avoid this by simply altering the Method control to display the desired area selection. WinImages F/x will automatically interpolate any previously associated area selections to fit the selection mode. You always have the option of reselecting the region by pressing the Make area selection now button. Once an area select is deleted, all of the area selection information will be lost.
| Quick Nav Bar | ||||||||
|---|---|---|---|---|---|---|---|---|
| << Previous | Contents |
Selection |
Op Index |
Parent | User Notes |
Index |
Glossary |
Next >> |
| WinImages F/x Manual Version 7, Revision 5, Level B |
 . If the area selection or operation is not to interpolate, the progression arrow will look like this:
  . It is also important to remember that turning off the interpolation will turn off all of the interpolative features of an area selection. An operation's interpolation can remain "on" even if the area selection's interpolation is "off".