Page 298
Timeline Controls - Action, Brush and Source Image Dialog Controls
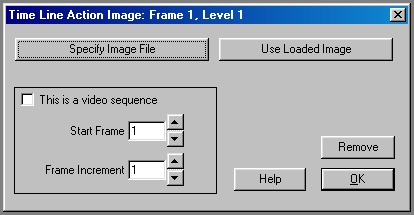
Timeline Action Image Dialog
(Brush and Source dialogs are similar)
Specify Image File
Pressing this button will access an "Explorer"-style file dialog for selecting the image files or animation file to be used as a source or action image unless you have the
Image Manager open and files selected in the Image Manager's thumbnail pane. In that case, the files are loaded into the timeline using the Image Manager's selection set. This is the recommended method, because the Image Manager provides much better control over file selection, ordering and choice than do the OS "Explorer"-style dialogs, and eliminates the problems that "Explorer"-style dialogs have historically presented (such as absurdly out of order selections and limited number of succussfully selectable files.)
Image files can be selected in many different ways. You can select a single file from the dialog to be processed as an action, source or brush image, you could select multiple files to be processed as a sequence of action and source or brush images, or you could elect to load an animation file.
When using the Explorer style dialog, multiple files can be selected by clicking on the first file in the sequence, using the scroll bar to locate the last file in the sequence, and then pressing the Shift key and clicking on the final file name.
Tip: |
A Windows OS bug can cause groups of files to load out of the order they appear in the Explorer file dialog. For some strange reason, selecting the last file, first, and then shift-selecting the first file, last, gets around this and always causes the images to load in the proper order. Again, it's not us, we've investigated it thoroughly, and this is definitely an issue of how windows provides the group of files to us from the file dialog. |
|
Either way will select all of the files between the first and last file that you specified. Once you have the desired files selected, press the OK button to place the files into the Timeline. You can select multiple files that are not in sequence by holding down the Ctrl key while selecting the desired image files.
Once the files are placed into he Timeline, they are treated like any other Timeline object. This allows you to increase or decrease the number of frames that the image will be used, alter its position, or delete it from the Timeline.
But you're better of using the Image Manager!
Use Loaded Image
This option allows you to select an image that is already loaded as the source, brush or action image for an operation. You also have the option of selecting a file from a previous Timeline level. This allows you to process multiple sets of action images, and then place them into another action image sequence as source files. For example, you could process action image sequence A on levels one and two of the Timeline, and then use those images from sequence A as source or brush images for action image sequence B. The dialog allows you to select the level that the source, brush or action image will come from. You can also specify an image which is already loaded into memory as the source, brush or action image for a Timeline operation.
This is a Video Sequence
This check box denotes that the file or files you have selected are video sequence. A video sequence is any supported animation format (FLI/FLC, AVI, and FLM). It is possible to specify a non-animation file as a video sequence, but the file specified will only be used the specified number of frames. Real animation files can be placed into the Timeline at any frame number, and with any frame increment (see below for more details). It is suggested that you do not specify non-animation files as video sequences.
Start Frame
The Start Frame control allows you to specify the beginning frame number for a video sequence. This allows you to specify any value as the initial frame for the animation sequence. For example, you could start an FLC animation file on frame 3 instead of frame 1. If you specify a value that is beyond the total number of frames in the animation sequence, WinImages F/x will automatically use the last frame in the sequence for the entire specified length.
Frame Increment
The Frame Increment control allows you to specify the way WinImages F/x will load files from a video sequence. A setting of one will load every frame in the sequence (1, 2, 3...), a setting of two will load every other frame (1, 3, 5...), and a setting of three will load every third frame (1, 4 , 7...). This control can be set to any value you like up to a setting of every 1000th frame being used. The default setting for this control is one. You can also alter the starting frame value by adjusting the Start Frame control.
Remove
The Remove option will remove the current action or source image file from the Timeline. An action, source or brush image can also be removed by selecting the Delete key while the file is selected (highlighted) in the Timeline.
Page 298
WinImages F/x, WinImages Morph and all associated documentation
Copyright © 1992-2007 Black Belt Systems
ALL RIGHTS RESERVED Under the Pan-American Conventions
| WinImages F/x Manual Version 7, Revision 5, Level B |
HTML Documentation Management System © 1992-2007 Black Belt Systems