
| Quick Nav Bar | ||||||||
|---|---|---|---|---|---|---|---|---|
| << Previous | Contents |
Selection |
Op Index |
Parent | User Notes |
Index |
Glossary |
Next >> |
|
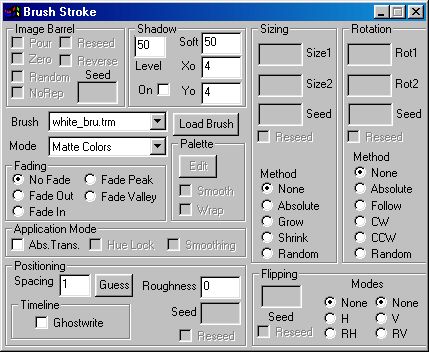
a=STAPP(ABS,HUE,SMOOTHING) a=STBARREL(pour,reseed,norep,reverse,zero,random,seed) a=STFADE(MODE[0-4]) a=STFLIP(seed,RESEED,HMETHOD[0-2],VMETHOD[0-2]) a=STPAL(SMOOTH,WRAP) a=STPOS(spacing,roughness,seed,RESEED,GHOSTWRITE) a=STROTATE(rot1,rot2,seed,RESEED,METHOD[0-5]) a=STSHADOW(ON,level,soft,xo,yo) a=STSIZING(size1,size2,seed,RESEED,METHOD[0-4]) a=STROKE() |
| Items in CAPS are 0/1 switches or switches with more options than 0/1. |
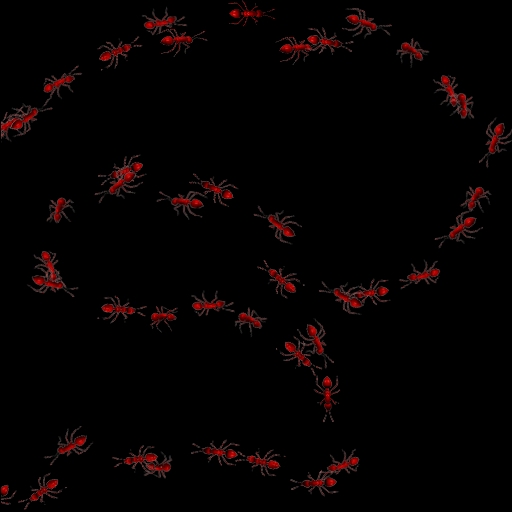
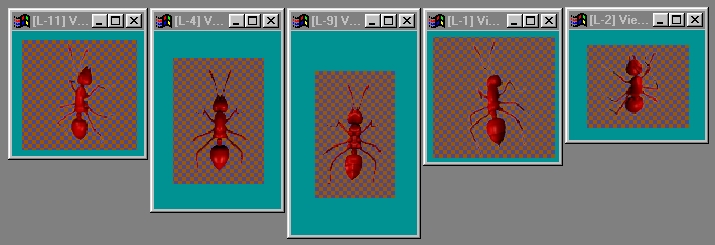 This is the Image Barrel the above image was made from. Sizing set to .5 absolute, roughness set to 22, spacing set to 44, Rotation set to Follow. Barrel set to Pour, Random, NoRep. Random Horizontal flipping. |
The Stroke Operator is a powerful drawing tool that can perform many of the common operations you might want in a painting system. Many of the operations are unique in how they handle brushes; It is sure to be worth your time to experiment (no, play!) with the options in this operator!
|
This operator can use Pixel Transfer Modes to generate output image and layer data. These modes add a great deal of flexibility to what you can do with this operator. Only operators that create new image or layer data use pixel transfer modes. Also, plugins may use them if the plugin designer takes care to use the plugin masked write services.
Pour (Image Barrel)
If the selected brush is a layer from a currenly layered image, then this selection will allow you to "pour out" each image in turn from each layer in the image, or pour them out randomly, along the path of your brushstrokes.
Zero (Image Barrel)
This forces the first image out to be the first image in the barrel for each brushstroke taken.
Random (Image Barrel)
This causes the images to be poured out in random order.
NoRep (Image Barrel)
When Random is checked, this ensures that in an image with more than two layers, the images will never repeat immediately - there will be at least one image that is not the previous image before the previous image appears again.
Reseed (Image Barrel)
This causes the brushstroke random order to be re-seeded on each brush stroke, resulting in the same (pseudo-random) order of barrel images being drawn.
Reverse (Image Barrel)
This causes the barrel contents to be produced in reverse order, if Random is off.
Seed (Image Barrel)
This is the seed for the random number system that controls the pattern that the barrel contents are dealt out with. If you change this number, you change the order of the pour, even if re-seed is on.
Level (Shadow)
If shadowing is on, this controls how dark the shadow is.
On (Shadow)
This turns shadowing on and off.
Soft (Shadow)
This controls how soft the shadow is. Higher values create softer shadows, but take longer to generate.
Xo (Shadow)
X offset for the shadow placement.
Yo (Shadow)
Y offset for the shadow placement.
Brush
This is the image that will be used as the brush for the brustroke. If the image selected is a layer from a currently layered image, then the Barrel options elsewhere in the dialog will become available.
Load Brush
This allows you to load a brush image from the computer's filesystem.
Mode
This is the drawmode for the brushstroke. Matte means, use the brush colors and replace the iamge colors with them. Add means add the brush colors to the image colors. Palette means use the colors from the palette instead of the brush colors.
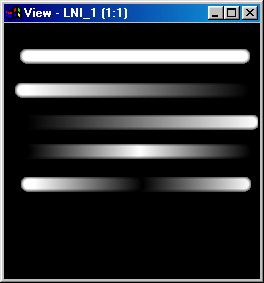
No Fade (Fading)
The brush is always painted at full density.
Fade Out (Fading)
The brush is initially painted at full density, but fades out to zero density by the end of the brushstroke.
Fade In (Fading)
The brush is initially painted at zero density, but fades in to full density by the end of the brushstroke.
Fade Peak (Fading)
The brush is initially painted at zero density, but fades in to full density by the middle of the brushstroke and then fades out again to zero density by the end of the brushstroke.
Fade Valley (Fading)
The brush is initially painted at full density, but fades out to zero density by the middle of the brushstroke and then fades in again to full density by the end of the brushstroke.
The following image demonstrates all five fade modes:
Edit (Palette)
This allows you to edit the palette used in the Palette drawing mode.
Smooth(Palette)
If the drawmode is Palette, then this causes the colors in the palette to be interpolated for a smooth, creamy look.
Wrap (Palette)
This means that when the last color in the palette is used, the drawing begins again with the first color in the palette. When this operator is dragged into the timeline, palettes will automatically trend to the next palette, if another exists in the timeline.
Abs. Trans (Application Mode)
This affects how transparency in the brush is computed. When unchecked, the brush density adds each time any part of a brush covers a pixel. When checked, the brush density only reaches the density of the maximally dense portion of the brush that was positioned over a pixel at any one time during a brush stroke.
Hue Lock (Application Mode)
This forces the color added to reach a maximum of the brush color without changing hue. If increasing the brush density in any channel would change the hue of the result, the brush is no longer applied.
Smoothing (Application Mode)
This affects how the transparency is mapped; it is filtered when this is on.
Spacing (Positioning)
This controls how far along the path the stroke must proceed before another brush image is placed on the path.
Guess (Positioning)
This fills in the Spacing parameter with a guess a brush spacing that will allow brushes to land far enough apart that they will not write over each other.
Ghostwrite (Positioning, Timeline)
When the Stroke operator is used in the timeline, this tells Stroke to only trace the part of the brush path that is percentage-wise equal to the amount of the timeline that has been executed. This results in the path you drew appearing from 0 to 100% over 0 to 100% of the timeline frames.
Roughness (Positioning)
This allows you to specify that brush placement is not precisely on the line you drew, but may deviate by the amount you enter here. Affected by the Seed and Reseed controls in the Positioning subgroup.
Seed (Positioning)
This controls what pattern the roughness takes. Changing this value will change the pattern of the roughness even if Reseed is on.
Reseed (Positioning)
This causes the roughness generator to restart with each brushstroke.
Size1 (Sizing)
This size is one of the two sizes used for sizing computation modes that need two sizes. See below.
Size2 (Sizing)
This size is one of the two sizes used for sizing computation modes that need two sizes. See below.
Seed (Sizing)
This controls what pattern the sizing takes. Changing this value will change the pattern of the sizing even if Reseed is on.
Reseed (Sizing)
This causes the Sizing pattern to be restarted with each brushstroke.
None (Sizing, Method)
Absolute (Sizing, Method)
This causes the brush placements to be sized to Size1.
Grow (Sizing, Method)
This causes the brush placements to run from the larger of the two sizes to the smaller of the two sizes over the course of the brushstroke. The order the sizes are entered in does not matter.
Shrink (Sizing, Method)
This causes the brush placements to run from the smaller of the two sizes to the larger of the two sizes over the course of the brushstroke. The order the sizes are entered in does not matter.
Random (Sizing, Method)
This causes the brush to be placed in a random size that will vary between Size1 and Size2.
|
Rot1 (Rotation)
This rotation value is one of the two values used for rotation computation modes that need two values. May usefully vary from -180.0 to 180.0 See below.
Rot2 (Rotation)
This rotation value is one of the two values used for rotation computation modes that need two values. May usefully vary from -180.0 to 180.0, but can be any rotation amount. See below.
Seed (Rotation)
This controls what pattern the rotation takes. Changing this value will change the pattern of the rotations even if Reseed is on.
Reseed (Rotation)
This causes the rotation pattern generator to restart with each brushstroke.
None (Rotation, Method)
The brush placements are not rotated.
Absolute (Rotation, Method)
Rotates the brush to the value set in Rot1.
Follow (Rotation, Method)
Follow causes the brush to rotate so that the top of the brush image is oriented in the direction of the brushstroke.
CW (Rotation, Method)
The brush is rotated from the larger of the Rot1 and Rot2 values, to the smaller.
CCW (Rotation, Method)
The brush is rotated from the smaller of the Rot1 and Rot2 values, to the larger.
Random (Rotation, Method)
The brush is rotated to a position from Rot1 to Rot2.
Seed (Flipping)
This controls what pattern the flipping takes. Changing this value will change the pattern of the flipping even if Reseed is on.
Reseed (Flipping)
This causes the flipping pattern generator to restart with each brushstroke.
None, Horizontal (Flipping, Modes)
The brush will not be flipped horizontally.
H (Flipping, Modes)
The brush will be flipped horizontally.
RH (Flipping, Modes)
The brush will be flipped horizontally in a random manner.
None, Vertical (Flipping, Modes)
The brush will not be flipped vertically.
V (Flipping, Modes)
The brush will be flipped vertically.
RV (Flipping, Modes)
The brush will be flipped vertically in a random manner.
| Quick Nav Bar | ||||||||
|---|---|---|---|---|---|---|---|---|
| << Previous | Contents |
Selection |
Op Index |
Parent | User Notes |
Index |
Glossary |
Next >> |
| WinImages F/x Manual Version 7, Revision 5, Level B |