
| Quick Nav Bar | ||||||||
|---|---|---|---|---|---|---|---|---|
| << Previous | Contents |
Selection |
Op Index |
Parent | User Notes |
Index |
Glossary |
Next >> |
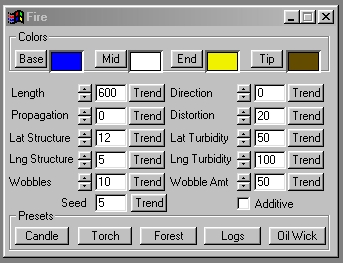
| a=FIRE(length, direction, propogation, seed, lat structure, lat turbidity, lng structure, lng turbidity, wobbles, wobble amt, distortion, ADDITIVE, br, bg, bb, mr, mg, mb, er, eg, eb, tr, tg, tb) |
| Items in CAPS are 0/1 switches or switches with more options than 0/1. |
|
The Fire operation allows you to create a wide range of animated flames and fires. The types of fires that you can create range from candle flame to a forest fire. You can control the fire length, color, number of flames, distortion, and direction. The fire can be placed at any angle value ranging from 0 to 360 degrees around the area selection. The flame or flames will always appear outside of the specified area selection in the direction set in the dialog. The size of the flame is based upon the size of the area selection and the length parameter. It is possible, with large area selections, to have flames that are completely off of the image.
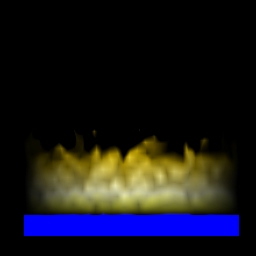
This effect is spectacular when animated. The simplest way to animate the effect is to trend the propagation option. This setting gives the flame effects their life by modulating the flame height, distortion, and wobbling based upon the see value. Trending the effect from 0 to 360 degrees will create a looping flame effect that is very stunning. The animation below shows a fire that fades slightly to show the text behind. You should notice the distortion on the letters and how the flames actually appear to grow and shrink in size like a real flame.
|
Trends
You will notice that all of the controls have a Trend button next to them. The trend button allows you to set that variable over a set of frames. Each frame of the animation can be thought of as a slice of time. The trends allow you to alter some, all, or none of the variables for a particular time slice. You will notice that the trend graphs have equidistantly spaced vertical lines. Each of these lines represents a frame in the animation. The number of frames can be altered using the Sequence controls... in the Timeline pull down menu. Animation lengths of 100 - 999 frames will be represented with a vertical bar being 10 frames, and animation length greater than 1000 frames will have a vertical bar for every 100 frames. Click here to view more information on Trends.
Length
This control sets the total length of the fire flame or flames. This length is determined by this setting, and the actual size of the area selection. For example, if you select a large rectangle, then the flame will be sized according to the width of the rectangle, and the length setting. All flames will appear outside of the specified region in the selected direction. The length control can range from 0 (no effect) to 1000 (1000 times the length of the area selection. Large length settings can create flames that appear completely off of the image. If this occurs, you can decrease the length setting, or decrease the overall size of the area selection.
Direction
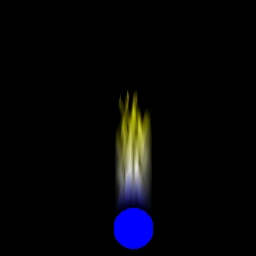
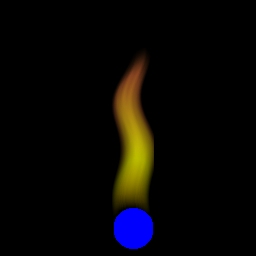
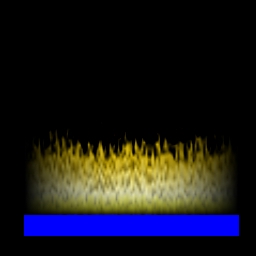
The direction control allows you to set the direction that the flame will be generated in. The angle value that is set here will determine the direction that the flame is applied to the area selection. The direction is measured clockwise from vertical. This setting will determine the direction that the flame will come off of the area selection. The images below show a rectangular area selection with the flame operator in four separate directions: 0, 90, 180, and 270. As you can see the 90 degree setting causes all off the flame to appear to the right of the area instead of on top of the area.
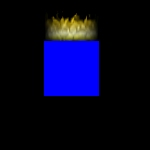 0 degrees |
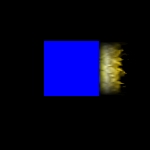 90 degrees |
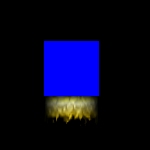 180 degrees |
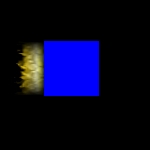 270 degrees |
Propagation
The propagation control allows you to alter a flame's position in the structure of the fire effect. The propagation control is primarily used to cycle the flame effects motions. This includes all of the motion parts of the flame - flame wobbles, distortion, and single flame position in the total fire. For example, in the forest preset trending the propagation from 0 to 360 will cause all of these flame elements to cycle in a realistic manner - Flames will grow and shrink in size, the heat distortion will alter the background differently, and the flames will move based on the trended propagation. It is important to remember that due to the large number of factor affecting a flame, a flame will not look the same in the middle of the propagation (180) as it did at the initial position (0).
Seed
The Seed value will determine how the flames will be "randomly" placed along the specified area selection in the desired direction. These seed values can range from 0 to 32,000, which gives you an almost limitless number of different flame patterns. Each seed value is distinct, and no two seeds will repeat. The seed values also allow you to create the same looking flame or group of flames time after time. If you find a seed number and aura setting that is appropriate for your work, we suggest that you save those settings by selecting the Save Op Settings option from the Operation menu. This will save all of the various parameters associated with the aura dialog. It is important to remember that even though a seed value can produce the same flame or flames twice, altering any of the other values will change the entire look of the effect.
Color Selection
Base, Mid, End, and Tip Color Selection: The Base, Mid, End and Tip colors determine the colors that will be used at the specified fame locations. Each color is faded into the next at four percentage values 0%, 30%, 80%, and 100%. This means that from 0 to 30% there is a fade of colors from the base color to the mid color, and then so on for each color up to the tip color. The default settings are only a suggestion for that particular flame structure. You can select any colors that you desire for the various flame components. For example, you may like to try an all blue or green flame with the forest fire structure. Each color is individually set by the Set button located to the right of the color preview. If you would like to learn more about the set color dialog, Click Here.
Lateral Structure
The Lateral Structure control sets how the flame or flames will look. This control can simply be thought of as the total number of flames. How these flames appear (separate or together) is based upon the Lateral Turbidity setting. This setting defines how much motion and separation the flames have laterally. You can have between 0 and 200 separate lateral structures or flames. How these flames look is dependent on the number of longitudinal structure and the turbidity setting. The best way to understand how lateral structures alter the look of a flame it to apply each of the preset values side by side, and then review their specific settings to see where the changes occurred and how they effected the fire effect.
Lateral Turbidity
The Lateral Turbidity determines how distorted and separated the flames will appear. The control itself determines if the flame will be treated as a single flame (candle preset) or as a number of flames (forest preset). Turbidity values below 50 will cause the program to treat all of the lateral structures as a single flame. Values of 50 or greater will cause each lateral structure (flame) to be treated individually. This is very important to remember - especially for animations. For example, decreasing the lateral turbidity (below 50) for the forest preset would cause the individual flames to move as a single flame similar to the logs preset.
Longitudinal Structure
The Longitudinal structures are subtle changes along the length of each flame element that make it appear more realistic. This effect of this control is directly related to its turbidity setting. If the turbidity is high, then this control can truly alter a flame to the point of distortion. For this reason, all of the preset values use very few Longitudinal structures. The control ranges from 0 (no structures) to 200. You should notice that increasing this value will cause the flames to look more disjointed, and in many cases less realistic.
Longitudinal Turbidity
This control gives the Lateral structures their motion and structure along the length of the flame. Increasing the turbidity will increase the amount of distortion along the flames length. You should notice that most of the presets use the longitudinal preset in medium to high values with a low number of longitudinal structures. This will give the fire the desired depth or realness while eliminating distortion. The best way to understand how this control effects the flame, is to view a preset values, and then increase or decrease the turbidity and reapply the effect. In most cases the default settings can help you to develop your own flame and fire effects.
Wobbles
This control can be used to set the number of "wobbles" or distortions in the flames. This differs from the Distortion amount in that Wobbles controls more of how the flame is distorted, instead of the background distortion. You can have settings that range from 0 (no wobble) to 20 wobbles in a flame. The size of the wobbles is determined by the amount setting. Increasing the wobbles and the wobble amount will also increase the overall distortion in the flames. As with all of the other controls for this operation, you should look at the preset values as an initial basis for your understanding of a control. After you have viewed how the control alters the effect, try altering a preset with new values to create new and unusual flame effects.
Wobble Amount
This control sets the size or intensity of the wobbles/distortions in a flame. The amount can range from 0 (no wobbles) to 100 which allows for the greatest amount of variance from flame to flame in the fire. Increasing this value to much can result in unwanted or un-needed distortions. Please refer to the preset values for a better understanding of how this control alters the overall fire effect.
Distortion
The distortion setting allows you to set the amount of distortion caused by the "heat" of the flames. The heat distortion occurs behind the flames, and is most visible and the edges of the flame, or if you decrease the transparency level of the effect (the Transparency controls are located in the Area menu). The effect can range from a setting off 0 (no distortion) to 100 (maximum distortion). This setting can help to give your flame or fire effect an even more realistic look. For added heat waves, try the placing Waves operation's Heat Wave preset above the flames.
Presets
Candle: The Candle preset uses a small Lateral and Longitudinal Structure with no turbidity to create an effect similar to a burning candle. Notice that the length setting is very high. This gives the flame the long flame that is typical for many types of candles. This means that you should use a very small area selection so that the entire flame appears on the image.

Torch: The Torch preset uses a small number of Lateral and Longitudinal structures with lots of turbidity to create separate flames in a torch like pattern. These settings result in a small number of flames that vary greatly from one another in size and structure like flames from a burning torch. The length setting for this preset is also a very high setting. This means that you should use a very small area selection so that the entire flame appears on the image.
Oil Wick: The Oil Wick preset uses setting similar to the Torch preset to emulate an oil wick burning. You should notice that the oil wick contains the same number of lateral structures, but a decreased turbidity. This gives it the appearance of a single flame instead of multiple small flames in the torch.
Forest: The Forest preset tries to emulate the look of a raging forest fire or other intense fires. The flame contains a large number of flames and turbidity which gives it the look of a large blazing fire. The animation example above uses the Forest preset with the propagation setting trended.
Logs: This is a more subtle version of the Forest preset. There are fewer flames, and they are more connected together. This is due to the fact that there are fewer longitudinal structures and a decreased turbidity.
| Quick Nav Bar | ||||||||
|---|---|---|---|---|---|---|---|---|
| << Previous | Contents |
Selection |
Op Index |
Parent | User Notes |
Index |
Glossary |
Next >> |
| WinImages F/x Manual Version 7, Revision 5, Level B |