
| Quick Nav Bar | ||||||||
|---|---|---|---|---|---|---|---|---|
| << Previous | Contents |
Selection |
Op Index |
Parent | User Notes |
Index |
Glossary |
Next >> |
| a=AURA(width, connect, radiate, seed, spokes, spoke variance, rings, ring variance, innerfade, r, g, b, outerfade, ro, go, bo) |
| Items in CAPS are 0/1 switches or switches with more options than 0/1. |
|
The Aura operation will produce a glowing effect around the specified area selection. This can be used to create a glowing text outline (like the anim below), or as an aura outline for an object or person. It is important to remember that the aura outline will take place outside the area selection. For example, the animation below used the font are selection tool to place the aura around the word WinImages. The aura takes place completely outside the original area selection (the text). The outline placement of the Aura effect also limits the Redo area selection mode to areas outside the aura effect. If you would like to preview several auras, we suggest that you use the desired area selection mode, and the edit control after the initial area selection. This will force WinImages F/x to place the actual area selection back in the view instead of the outline selection.
The Aura operation uses a random setting to create a shifting motion along the spokes and rings. This gives the glimmering effect that is seen in the animation. These spokes and rings can vary in size, position, number, and intensity. You can control the color of the inner and outer aura ring, the color intensity, the number of rings and spokes, and the width of the outline. It is important to remember that this operation can take a large amount of time to generate, and increasing the width value will also increase the necessary generation time.
Trends
You will notice that all of the controls have a Trend button next to them. The trend button allows you to set that variable over a set of frames. Each frame of the animation can be thought of as a slice of time. The trends allow you to alter some, all, or none of the variables for a particular time slice. You will notice that the trend graphs have equidistantly spaced vertical lines. Each of these lines represents a frame in the animation. The number of frames can be altered using the Sequence controls... in the Timeline pull down menu. Animation lengths of 100 - 999 frames will be represented with a vertical bar being 10 frames, and animation length greater than 1000 frames will have a vertical bar for every 100 frames. Click here to view more information on Trends.
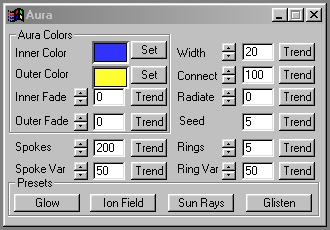
Width
The Width control allows you to select the width of the aura around the specified area selection. This width is measured as a percentage of the original area selection, but it is placed completely outside the area selection. This means that the area selection will serve only as the outline for the effect. This value can range from a width of 0 percent (no effect), to a width of 100 percent which would be a width based on the area selection's total area. Increasing this value will also increase the amount of time required to complete the operation.
Connect
This control allows you to alter the amount of connectability between the spokes and rings in the aura. The setting ranges from 0 (no connection between spokes and rings) to 100 (all spokes and rings are connected). The best way to demonstrate this point is to look at two of the preset operations, and how they use the connect option to achieve different looking auras. The Glow and Sun Rays presets use the connect option at its two extents (all connected and all separated). The Glow preset uses a Connect setting of 100 so that the spokes and rings appear as one cohesive stream or aura around the selected area. This can also be seen in the Glisten preset which uses a connect setting of 90. You should notice that this preset will have some spokes that are not connected with the rest of the spokes. The Sun Rays preset takes the opposite extreme by setting connect to 0. This results in all of the spokes appearing as separate rays. If you were to increase the connect setting you would increase the number of rays that are connected. It is important to remember that spokes and rings will be connected together regardless of the size differences created by the Spoke and Ring Variance controls.
Radiate
This option controls how the rings and spokes move over time in an animation, or their initial position in a still image. This value, like all rotational values in WinImages F/x, ranges from 0 to 360 degrees with 0 and 360 being the same value. The primary use for this option is trending the radial movement of the aura. By doing this you can create a wide range of moving aura effects. For example, trending this value for the Sun Rays preset will create a glimmering aura that radiates outward over a sequence of frames. Please refer to the AVI example above to see an example of this effect.
Seed
The Seed value will determine how the spokes will be "randomly" placed around the specified area selection. These seed values can range from 0 to 32,000, which gives you an almost limitless number of different aura spoke patterns. Each seed value is distinct, and no two seeds will repeat. The seed values also allow you to create the same looking aura time after time. If you find a seed number and aura setting that is appropriate for your work, we suggest that you save those settings by selecting the Save Op Settings option from the Operation menu. This will save all of the various parameters associated with the aura dialog. It is important to remember that even though a seed value can produce the same aura twice, altering any of the other values will change the entire look of the aura.
Spokes
The Spokes control is used to specify the number of radial arms or spokes in the aura. These radial arms can be set to all be the same size or height, or they can be set so that all of the spokes has a varied height based on the Spoke Variance setting. The maximum arm height is equivalent to the total width setting. The spokes will be placed around the specified area using the specified Seed Number, number of spokes, and the spoke variance. These values will determine how the spokes will appear around the specified area. The Seed number will alter the position of each of the spokes, and the Spoke variance will determine the amount of varied heights around the area selection.
Spoke Variance
The Spoke Variance option allows you to alter the height of the spokes based on the total width and fade settings. This value can range from a setting of 0 (no spoke length variance) to a setting of 100 (maximum amount of length variance from spoke to spoke. Setting between these values will create a wide range of interesting patterns and undulations. This control only describes the maximum amount of variance, not how the spokes will vary. That determination is made based on the seed number. Each seed number will produce a different spoke pattern and undulation. You should experiment with various seed numbers if you do not like how the default values look.
Rings
The rings control allows you to specify the total number of aura rings. It is important to note that these rings are not necessarily visible for all setting. The rings are primarily seen in an animation sequence where the radiate option has been trended. In those animations you will see slight undulation along the spokes. This is caused by the rings radiating outward. The total number of ring will determine how intense this undulation is. The Ring Variance alters the size and spacing of the rings based on the current seed value. The only time that specific rings are visible is when there are very few spokes (1or 2). In these cases you will see each ring around the selected area. The Glow preset uses a single ring and spoke to create a hazy glow around the specified area.
Ring Variance
This setting allows you to alter the amount of variance between the rings of the aura. As stated above, rings are not always visible in an aura. In most cases the rings will only be visible when the Radiate Trend is set to radiate the aura from 0 to 360 degrees. In those cases the rings will appear as the lateral undulation along the spokes. The variance setting controls how varied those undulations are. A setting of 0 means that each undulation has the same size and spacing based on the current seed number. A setting of 100 will result in the greatest amount of variation between each rings size and spacing. An example of this is the Sun Rays preset. This preset shows a great deal of undulation along the spokes of the aura.
Inner Color
The Inner Color selection allows you to alter the color that appears just outside the specified area selection. This color is set using the Color Selection dialog. Click Here to view more information on this dialog. The transparency of the inner color is controlled by the Inner Fade control. This control sets how transparent the inner and outer colors appear.
Outer Color
The Outer Color selection allows you to alter the color that appears outside of the inner color around the area selection. This color is set using the Color Selection dialog. Click Here to view more information on this dialog. The transparency of the outer color is controlled by the Outer Fade control. This control sets how transparent the inner and outer colors appear.
Inner Fade
The Inner Fade control allows you to specify how the default aura transparency will be applied to the inner color. The default setting is for both the inner and outer colors to have a ramped transparency. This means that no color appears at either edge of the aura, but the color is completely visible in the center of the aura width. Increasing this fade value will decrease this transparency amount. This means that more and more color will become more opaque closer to the initial area selection. A setting of 100 (maximum) will result in the inner color appearing fully opaque at the edge of the effect. Increasing this value is one way of increasing the total visible amount of the effect.
Outer Fade
The Outer Fade control allows you to specify how the default aura transparency will be applied to the outer color. The default setting is for both the inner and outer colors to have a ramped transparency. This means that no color appears at either edge of the aura, but the color is completely visible in the center of the aura width. Increasing this fade value will decrease this transparency amount. This means that more and more color will become more opaque closer to outside edge of the aura width. A setting of 100 (maximum) will result in the inner color appearing fully opaque at the edge of the aura width. Increasing this value is one way of increasing the total visible amount of the effect.
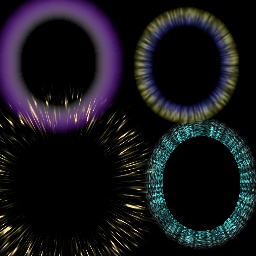
Presets
Glow: The Glow aura preset will produce a faint blue outline around the selected region. This aura has only a single spoke and ring, so it appears as a translucent solid ring around the specified area. This could be used to give a ghostly or ethereal appearance to an object or person.
Ion Field: The Ion Field preset uses a large number of connected spokes to create an effect that looks similar to an ionic or magnetic field. Try trending the Radiate option with this preset to create a moving field around the selected area.
Sun Rays: The Sun Rays preset uses a large number of highly varied spokes to create a radiating aura similar to the glimmer or radiance of sun rays. This preset also sets the Connect option to 0 which makes all of the spokes around the area appear un-connected.
Glisten: The glisten aura uses a large number of connected rings and spokes to create a glistening aura around the specified area. Trending the Radiate parameter will create an undulating aura effect around the area selection.
| Quick Nav Bar | ||||||||
|---|---|---|---|---|---|---|---|---|
| << Previous | Contents |
Selection |
Op Index |
Parent | User Notes |
Index |
Glossary |
Next >> |
| WinImages F/x Manual Version 7, Revision 5, Level B |