
| Quick Nav Bar | ||||||||
|---|---|---|---|---|---|---|---|---|
| << Previous | Contents |
Selection |
Op Index |
Parent | User Notes |
Index |
Glossary |
Next >> |
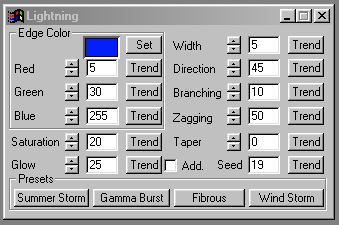
| a=LIGHTNING(width, direction, branching, seed, zag, red, green, blue, saturation, glow, taper, ADDITIVE) |
| Items in CAPS are 0/1 switches or switches with more options than 0/1. |
|
The Lightning operation allows you to create an element in the specified area that is similar to certain types of lightning strikes. The lightning area can be specified in one of two ways:
|
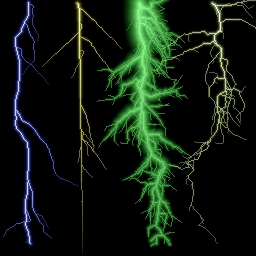
The Lightning operation uses a fractal based mathematics method of electrical simulation to create a random lightning bolt that is repeatable based upon a particular seed value. The seed values can range from 0 to 32,000, and can be used to produce an almost unlimited variety of lightning strikes. It is important to remember that even though the seed value will make the lightning repeatable, altering the branching or zagging controls can completely change the lightning bolt. If you find a lightning setting that is particularly useful to your work, we strongly suggest that you save those settings using the Save Op Settings option in the Operations menu. By doing this you will be able to reload the specific lightning bolt, and use at a latter time.
|
Trends
You will notice that all of the controls have a Trend button next to them. The trend button allows you to set that variable over a set of frames. Each frame of the animation can be thought of as a slice of time. The trends allow you to alter some, all, or none of the variables for a particular time slice. You will notice that the trend graphs have equidistantly spaced vertical lines. Each of these lines represents a frame in the animation. The number of frames can be altered using the Sequence controls... in the Timeline pull down menu. Animation lengths of 100 - 999 frames will be represented with a vertical bar being 10 frames, and animation length greater than 1000 frames will have a vertical bar for every 100 frames. Click here to view more information on Trends.
Add. (Additive)
This causes the effect to be added, rather than merged.
Width
The width control is used to determine how wide the lightning bolt will be relative to the size of the original area selection. This width specifies the maximum possible width for the main lightning bolt. Any branches or sub-branches will always be smaller than this value and the branch above. This prevents the lightning from having an extremely thin main bolt, and then very wide arms. The width can range from a setting of 0 (small width) to 20 (large width) through use of the slide gadget, or it can be increased up to a value of 100 by entering the value in the provided text entry field. In most cases a width of 20 will be more than adequate for all lightning bolts. Altering this value can also alter where the bolt will occur with in the selected area. Trending this value is one way of creating an "arcing" lightning bolt.
Direction
The direction control allows you to specify where the "top and bottom" of the lightning bolt will appear. The direction is measured as an angle value ranging from 0 to 360 degrees, with 0 and 360 being in the vertical up position. All angle values in the program will move clockwise from vertical. The diagram to the left demonstrates this point. The start and position will be determined by the angle value, and the extents of the area selection. If you are using the freehand or polygon tools to specify the start and end positions of a lightning bolt, then the furthest extents of the freehand or polygon line will be the starting and ending points of the bolt. By using the freehand or polygon the direction control will automatically be ignored.
Branching
The branching control allows you to specify a percentage amount of branching along the main lightning bolt. This control ranges from 0 (no branching) to 100 (many branches). This allows you to create a wide range of lightning effects from single bolts to a plasma storm. It is important to remember that changing this value will also change the lightning bolt pattern. This can be put to good use by trending this variable over time to create a moving lightning bolt.
Zagging
The Zagging control allows you to select how much the lightning bolt will deviate from its Direction angle value. The zagging can occur in any direction, and effects all branches of the lightning bolt. The zagging control ranges from 0 (no zagging) to 100 (maximum effect). Increasing this value will increase the number of turns or bumps in the main bolt and any branches.
Taper
The Taper control allows you to set the degree to which the bolt changes width from start to finish. With Taper set to zero. The bolt will be a uniform width all along the length of the main shaft. With Taper set to more than zero up to about 50, the striking end of the bolt (the final point in the area selection if you're using the polygon or freehand tool) will be narrower than the source end of the bolt. With Taper set to 100, the striking end of the bolt will narrow as far as possible, and it may also dim out to enhance the effect of the tip becoming less intense.
Seed
The Seed value allows you to specify a value for the fractal lightning bolt's "path". These seed values can range from 0 to 32,000, which gives you an almost limitless number of different lightning patterns. Each seed value is distinct, and no two seeds will repeat. The seed values also allow you to create the same lightning bolt time after time. IF you find a seed number and lightning setting that is appropriate for your work, we suggest that you save those settings by selecting the Save Op Settings option from the Operation menu. This will save all of the various parameters associated with the lightning dialog. It is important to remember that even though a seed value can produce the same lightning bolt twice, altering any of the other values will change the entire bolt.
Edge Color
The Edge color preview window and RGB sliders allow you to view and alter the color of the edge of the lightning effect. The edge color along with the saturation settings will determine the center color of the lightning effect. As the saturation value is increased the center of the lightning bolt will get closer to the specified edge color. At a saturation setting of 100, the entire bolt will be the specified edge color. The edge color can be altered using the RGB sliders, or by selecting the Set button. Pressing the Set button will access WinImages F/x's Color Selection dialog. This dialog can be used to select a color for the edge of the lightning bolt. After the desired color has been created, press the Ok button to exit the dialog. If you would like to learn more about the set color dialog, Click Here.
Saturation
The Saturation value controls how the lightning bolt will be colored. The saturation value can range from 0 (white) to 100 (completely edge color). A setting of zero saturation will result in an almost pure white bolt, and a setting of 100 will result in a bolt that is the same color as the edge color setting. As the saturation increases, then the color that was selected as the edge color will become more visible in the bolt. The increase occurs from the edge of the bolt inward.
Glow
The Glow setting allows you to select how much "aura" or surrounding light that the lightning bolt will produce. Real lightning will produce a glow around it based on it brightness and any surrounding moisture. We have tried to duplicate this effect by adding a glow to the edges of the main lightning bolt and some branches. The glow value ranges from 0 (no glow) to 100 (maximum effect). Increasing the glow amount will also increase the overall size of the lightning bolt.
| Quick Nav Bar | ||||||||
|---|---|---|---|---|---|---|---|---|
| << Previous | Contents |
Selection |
Op Index |
Parent | User Notes |
Index |
Glossary |
Next >> |
| WinImages F/x Manual Version 7, Revision 5, Level B |