
| Quick Nav Bar | ||||||||
|---|---|---|---|---|---|---|---|---|
| << Previous | Contents |
Selection |
Op Index |
Parent | User Notes |
Index |
Glossary |
Next >> |
| a=ASTERIZE(red, green, blue, center saturation, width, rotation, arms, CENTER GLOW, ADDITIVE, TAPER)
Check out this nifty scripted use of Asterize and this fully-blown animated camera flare effect that uses asterize. |
| Items in CAPS are 0/1 switches or switches with more options than 0/1. |
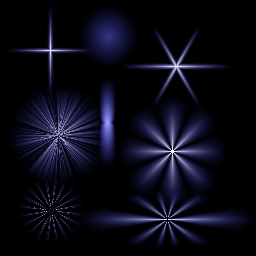
The Asterize operation allows you to place a star-shaped element into the current image. This effect is nice for putting a glint in a person's eye, or a glare on a metallic surface. There are several controls in the asterize dialog that allow you to alter the color, rotation, number of arms, and several other aspects of an asterization. Below is the detailed documentation for all of the asterize controls.
|
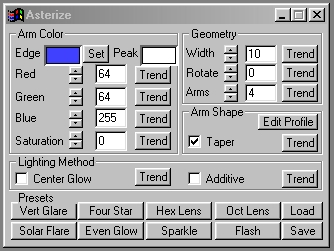
Edit Profile
|
The Edit Profile control allows you to alter the arm profile of the asterize operation. The arm profile is the color and width of each arm in the asterization. The graph is read from left to right (Clockwise along the arm). The vertical axis of the graph is the brightness or color of each portion of the arm, and the horizontal axis determines the length of each portion of the arm. You will notice that as the graph increases vertically that the color of the arm is getting closer to the peak color, and that as the graph decreases vertically that the color of the arm is approaching the edge color. It is important to remember that the arm profile that is specified will be used for all of the arms in the asterism. The profile is altered by simply drawing the desired profile using the left mouse button. There are several tools to aid in the creation of new profiles.
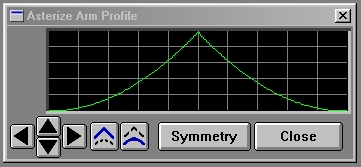
The directional arrows will move the curve the specified direction. This allows you to move the curve left, right, up, or down. Moving the curve up or down will flatten the top or bottom edge. Moving the curve left or right will simply shift the graph horizontally left or right. All changes to the arm profile can be saved using the Save option in the main asterize dialog.
The enhance option (blue peak) will increase the peaks and valleys in the curve. If you click on the enhance option the graph will then be amplified at its low and high points.
The smooth option (blue curve) will smooth any rough edges that are detected in the graph. This option will create a smoother graph with fewer rough edges.
The Symmetry option, when pressed, will make the graph have reflective symmetry. This means that any changes made to the left side of the graph are reflected to the right side of the graph. This option simplifies creating Asterizations that look smooth and even.
The close button will close the arm profile. The newly created profile will then be used in the next asterize operation, unless one of the preset asterize operations is selected first. Selecting one of the presets will alter the profile to fit the preset's specifications. This dialog can also be closed by double clicking on the System Menu box or by pressing Alt F4.
When this operator is dragged into the timeline, profiles will automatically trend to the next profile, if another exists in the timeline.
Trend
You will notice that most of the controls have a Trend button next to them. The trend button allows you to set that variable over a set of frames. You could have the rotation change from 0 to 180 degrees, have the Taper turn on and off, or even have the asterization change colors from red to blue. Each frame of the animation can be thought of as a slice of time. The trends allow you to alter some, all, or none of the variables for a particular time slice. Variables that have multiple states (Saturation, Width, and Rotation) can be set to any of a number of values in the trend. Variables that are either on or off (Taper, Center Glow, and Additive) can only have an on or off value in the trend. You will notice that the trend graphs have equidistantly spaced vertical lines. Each of these lines represents a frame in the animation. The number of frames can be altered using the Sequence controls... in the Timeline pull down menu. Animation lengths of 100 - 999 frames will be represented with a vertical bar being 10 frames, and animation length greater than 1000 frames will have a vertical bar for every 100 frames. Click here to view more information on Trends.
Edge Color Preview Window
The Edge color preview window allows you to view the color of the edge of the asterization. This color will change as the Red, Green, and Blue values are altered. The edge color along with the saturation settings will determine the Peak color of the asterization. As the RGB controls are altered the Edge color preview will be updated to reflect the changes.
Peak Color Preview Window
The Peak color preview allows you to view the color of the center of the asterization. The peak color will be the edge color, but can be altered using the saturation control. Increasing the saturation will cause the edge and peak colors to become similar. If the saturation is set to 100% then the peak and the edge color will be the same. A saturation value of zero will set the peak color to white.
Red
This slide gadget allows you to specify the Red component of the RGB value for the Edge color. This value can be altered by adjusting the sliders or by entering the values. The values for any of the RGB components range from 0 to 255.
Green
This slide gadget allows you to specify the Green component of the RGB value for the Edge color. This value can be altered by adjusting the sliders or by entering the values. The values for any of the RGB components range from 0 to 255.
Blue
This slide gadget allows you to specify the Blue component of the RGB value for the Edge color. This value can be altered by adjusting the sliders or by entering the values. The values for any of the RGB components range from 0 to 255.
Saturation
The saturation control allows you to adjust the amount of saturation applied to the edge color. The value for saturation and the value for the edge color will determine the peak color. Saturation is the perception received as more white light is added to a pure color. At 0% saturation the peak color will be white, but as the saturation increases the peak color will become more and more similar to the edge color. Then, at 100% saturation the edge and peak colors are the same. The saturation value is set using the slide control or by entering the values. The saturation values can range from 0% to 100%.
Width
This control sets the width of the center hot spot. The center hot spot is center of the peak color areas of the asterization. The width will also control when the arms will begin to taper, if the taper option is selected. The width is measured as a percentage of the entire area selection.
Rotate
This control allows you to set the rotation angle of the asterization. The angle can range from 0 to 360 degrees, and the rotation angle is measured from vertical moving clockwise (please refer to the diagram on the left.). The angle of rotation can be set using the slide gadget or by entering the appropriate value for the angle.
Arms
This control allows you to specify the number of arms that the asterization is to have. You may specify between 1 and 100 arms for an asterization. It is important to remember that each of the arms will follow the current arm profile. The number of arms can be set using the slide gadget or by entering the appropriate value.
Center Glow
This control will allow you to turn the center glow effect on or off. The diameter of the center glow is related to the Width setting. If the Width control is set to 0% there will be no center glow, but if width is set to 100% the entire asterization will be covered be the center glow. The center glow is enabled by clicking the center glow check box.
Additive
The additive option, when selected, will place the asterization into the image using no blending. If the asterization is applied to the same area with additive on, then the edge color will become less and less saturated with each application. If applied to the same area enough times the asterization would become white. A non-additive asterization will be blended onto the image using the edge and peak colors and the colors in the image itself. This will give the asterization a softer look.
Taper
The taper option, when selected, will force each of the arms to taper. The arms will taper based on the arm profile graph. For example, with a square arm profile and taper selected each arm would gradually taper using the square arm profile. If taper is not selected then the arms will follow the arm profile and not taper the ends. The Width control allows you to set when the arms will begin to taper. The taper option is selected by clicking on its check box.
Presets
Vertical Glare: The Vertical Glare preset will produce an asterization with two vertically placed arms. This effect is similar to what you see when moonlight is reflecting on water. As with all of the presets, you can alter any of the controls that you like. You also have the option to save variations of any of the presets or of any asterization that you create yourself. These settings files will have to be loaded to be used.
Four Star: This preset will produce a simple four armed star. As with all of the presets, you can alter any of the controls that you like. You also have the option to save variations of any of the presets or of any asterization that you create yourself. These settings files will have to be loaded to be used.
Hex Lens: The Hex Lens preset creates a six armed asterization. This is similar to light reflecting of the edges of a hexagonal lens. You also have the option to save variations of any of the presets or of any asterization that you create yourself. These settings files will have to be loaded to be used.
Oct Lens: This preset creates an eight armed asterization. This is similar to light reflecting of the edges of an octagonal lens. You also have the option to save variations of any of the presets or of any asterization that you create yourself. These settings files will have to be loaded to be used.
Solar Flare: This preset will produce a asterization with only one arm, but the arm profile is very random. The effect is similar to a solar flare. As with all of the presets, you can alter any of the controls that you like. You also have the option to save variations of any of the presets or of any asterization that you create yourself. These setting files will have to be loaded to be used.
Even Glow: This asterism will produce a soft glowing effect. You also have the option to save variations of any of the presets or of any asterization that you create yourself. These settings files will have to be loaded to be used.
Sparkle: This asterization is similar to the sparkle from a gem. You also have the option to save variations of any of the presets or of any asterization that you create yourself. These settings files will have to be loaded to be used.
Flash: This asterization preset is similar to the flash of a camera or any other sudden, bright light source. You also have the option to save variations of any of the presets or of any asterization that you create yourself. These settings files will have to be loaded to be used.
Load
This control allows you to load previously saved asterization settings files.
Save
This control allows you to save the current asterize settings files for later use.
See Also: Asterize Tutorial
| Quick Nav Bar | ||||||||
|---|---|---|---|---|---|---|---|---|
| << Previous | Contents |
Selection |
Op Index |
Parent | User Notes |
Index |
Glossary |
Next >> |
| WinImages F/x Manual Version 7, Revision 5, Level B |