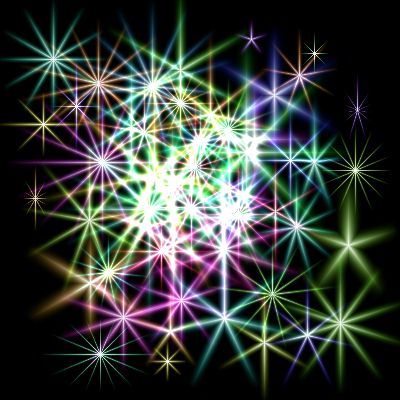
Saturated Random Asterizations Script Results
| Quick Nav Bar | ||||||||
|---|---|---|---|---|---|---|---|---|
| << Previous | Contents |
Selection |
Op Index |
Parent | User Notes |
Index |
Glossary |
Next >> |
10 Z=ASTERIZE(rnd(0)*255,rnd(0)*255,rnd(0)*255,0,WID,0,ARMS,0,1,1)
10 REM lines 100-120 assign values for the asterize parameters we'll be changing
20 REM R, G and B are calculated as zero through one (you'll see why in a minute)
30 REM lines 130 through 150 locate the minimum R, G or B value
40 REM lines 160 through 180 move r g and b down so that the minimum value becomes zero
50 REM lines 190 through 210 locate the maximum R, G or B value
60 REM lines 220 through 240 scale R, G and B so that the maximum R, G or B value is 255
70 REM line 250 executes the asterize operation - with fully saturated random colors!
80 REM You can pass S out as the center saturation too, for fun
100 R=RND()*1: G=RND()*1: B=RND()*1: S=RND()*100
110 ARMS=(RND()*13)+4
120 WID = (RND()*20)+10
130 MI = R
140 IF G<MI THEN MI = G
150 IF B<MI THEN MI = B
160 R = R-MI
170 G = G-MI
180 B = B-MI
190 MA = R
200 IF G>MA THEN MA = G
210 IF B>MA THEN MA = B
220 R = (R/MA)*255
230 G = (G/MA)*255
240 B = (B/MA)*255
250 Z=ASTERIZE(R,G,B,0,WID,0,ARMS,0,1,1)
260 REM Z=ASTERIZE(R,G,B,S,WID,0,ARMS,0,1,1)
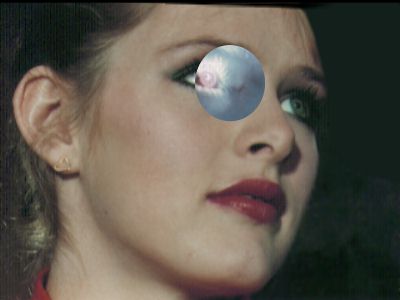
If you look this script over, you'll see it is processing every pixel in a rectangle described by X1, Y1, X2 and Y2, values it retrieves from WinImages F/x. But in the example image, the effect is round; what's going on?
The answer is easy: When you make your area selection, WinImages F/x creates a mask that limits the application of changes to the selected area. Technically speaking, this means that although you process the entire rectangle that contains the area selection, WinImages F/x prevents your changes from being applied anywhere outside the actual selection shape, which is often not rectangular at all.
This very simple mechanism allows you to concentrate on figuring out more generally what you want to do to the image pixels, while WinImages F/x takes care of almost all the area selection issues for you; all you need to do with regard to area selections is process a rectangle exactly as we show you here.
|
You can (and should!) use the image negative example here to create other image operations.
|
Here's a second example; this one uses the get and put hue functions to make the image greener. Otherwise, it is essentially the same as the negative example.
10 REM Demonstrates how to process an area selection - greener hue function
20 X1=GETX1(0): Y1=GETY1(0): X2=GETX2(0): Y2=GETY2(0)
30 FOR Y=Y1 TO Y2
40 A=PROGRESS(Y-Y1): IF A=1 THEN END
50 FOR X=X1 TO X2
60 H=GETHUE(X,Y)+20
70 A=PUTHUE(X,Y,H)
80 NEXT X
100 NEXT Y
110 REM This Inverts the BANG palette
120 A$ = "bang"
130 S = GETPALSIZE("BANG")-1
140 IF S > 0 THEN GOTO 170
150 PRINT "WHOOPS! ";A$;" HAS NO SIZE!"
160 END
170 FOR I=0 TO S
180 R=GETPALETTE(A$,I,"R")
190 G=GETPALETTE(A$,I,"G")
200 B=GETPALETTE(A$,I,"B")
210 R = 255-R
220 G = 255-G
230 B = 255-B
240 E=SETPALETTE(A$,I,"R",R)
250 E=SETPALETTE(A$,I,"G",G)
260 E=SETPALETTE(A$,I,"B",B)
270 NEXT I
10 REM Adds 10 to the named profile curve
20 A$="annular"
30 for i=0 to 200
40 d=getprof(A$,i)
50 d = d + 10
60 if d>255 then d=255
70 e=setprof(A$,i,d)
80 next i
10 REM multi-bolt lightning effect
20 FOR A=0 TO 350 STEP 10
30 B=LIGHTNING(5,A,10,A,50,5,30,255,20,25,0,1)
100 NEXT A
 10 r=128:g=128:b=128
 20 a=colorfill(r,g,b):               REM basic middle grey to texturize
 30 x=1:y=1:amt=100:luma=1
 40 a=dither(x,y,amt,RND()*100,luma): REM make fine grain texture
 50 x=8:y=8:amt=100
 60 a=dither(x,y,amt,RND()*100,luma): REM add large grain to texture
 70 radi=33
 80 a=blur(radi):                     REM wear the edges off the texture
 90 channel=5
100 a=minimum(channel,0):             REM expand the holes in the texture
110 amt=4
120 a=relief(amt):                    REM give it highlights and shadows
130 h=43:s=54:l=0:appsat=1
140 a=colorize(h,s,l,appsat):         REM turn it an aged gold color
150 amt=100:radi=20
160 a=sharpen(amt,radi)
170 x=3:y=3:amt=22
180 a=dither(x,y,amt,RND()*100,luma): REM give it some reflectivity
190 end

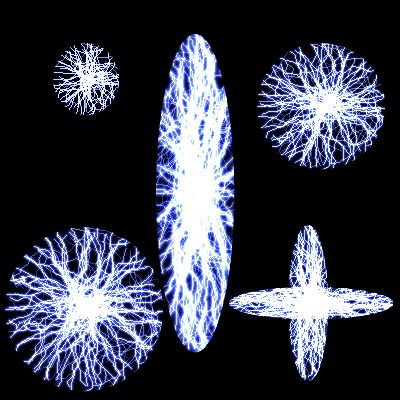
This is a great example of a more advanced script. This uses annular rings and an asterism to produce a very convincing "camera flare" effect. The effect follows a freehand area selection from the start point to the end point, and so can be made to track with bright spots and camera angles just as a real flare does - as shown in the example animation above.
5 REM this script creates a camera flare using annular ring and asterize
6 REM along with the freehand area selection tool (input from the user) and
7 REM a special elliptical area selection function. This doesn't set the
8 REM asterize profile because the default works well. For WinImages F/x R7.
10 REM general setup
20 a$="annular": REM this is the profile we'll need to change
30 pi = 3.141592653
40 xw = 30: REM xw and yw define the general size of the effects used
50 yw = 30
60 am = 1: REM am=1 means effects will be additive
70 REM get the endpoints of the line the user has drawn with the freehand tool
80 x1 = GETLI(0): y1 = GETLI(1): x2 = GETLI(2): y2 = GETLI(3)
90 REM p is the position along the line; siz is the size of the effect; peak is intensity
100 REM here are the mild rings
110 peak=50: gosub 6000: r = 255: g = 255: b = 255
111 p = 0.0: siz = 1.0: gosub 5000
120 p = .05: siz = .50: gosub 5000
130 p = .15: siz = .25: gosub 5000
140 p = .20: siz = .35: gosub 5000
150 p = .35: siz = .25: gosub 5000
160 p = .50: siz = .35: gosub 5000
170 p = .60: siz = .25: gosub 5000
180 p = .90: siz = .25: gosub 5000
190 REM here is the big flat glare
200 peak=25: gosub 7000: p=.75: siz=1.25: gosub 5000
210 REM here is the red ring
220 peak=50: gosub 8000: p=.75: g=0: b=0: siz=.90: gosub 5000
230 REM here is the little hotspot
240 peak=255: gosub 9000
250 p=.05: g=255: b=255: siz=.5: gosub 5000
260 REM asterize hot spot effect
270 cs=0: wid=20: rot=TLPOS(360): arms=7: p=.75: siz=2
280 x = x1 + ((x2-x1) * p): y = y1 + ((y2-y1) * p)
290 a=SELOVAL(x,y,xw*siz,yw*siz)
300 a=ASTERIZE(r,g,b,ccs,wid,rot,arms,1,0,am)
310 end
5000 REM draws an annular ring at position p along the line in rgb and profile
5010 x = x1 + ((x2-x1) * p): y = y1 + ((y2-y1) * p)
5020 a=SELOVAL(x,y,xw*siz,yw*siz)
5030 a=ANNULAR(r,g,b,0,am)
5040 return
6000 REM flat 75%, then hump to peak and back to zero profile subroutine
6010 l=peak * .25
6020 REM peak=200
6030 for ii=0 to 150
6040 a=SETPROF(a$,ii,l)
6050 next ii
6060 s=151: e=200
6070 for ii=s to e
6080 j=(ii-s)/(e-s)
6090 k=abs(sin(j*pi))*peak
6100 if j > .5 then goto 6120
6110 if k < l then k=l
6120 a=SETPROF(a$,ii,k)
6130 next ii
6140 return
7000 REM flat,then fall-off profile subroutine
7010 REM peak=64
7020 s=150: e=200
7030 for ii=0 to s-1
7040 a=SETPROF(a$,ii,peak)
7050 next ii
7060 for ii=s to e
7070 j = 1-((ii-s)/(e-s))
7080 a=SETPROF(a$,ii,peak*j)
7090 next ii
7100 return
8000 REM bright ring profile subroutine
8010 s=150: e=200
8020 REM peak=200
8030 for ii=0 to s
8040 a=SETPROF(a$,ii,0)
8050 next ii
8060 for ii=s to e
8070 j=(ii-s)/(e-s)
8080 k=abs(sin(pi*j))
8090 a=SETPROF(a$,ii,k*peak)
8100 next ii
8110 return
9000 REM burst profile subroutine
9010 s=0: e=200
9020 for ii=s to e
9030 j=1-abs(sin(((ii/200)/2)*pi))
9040 a=SETPROF(a$,ii,j*peak)
9050 next ii
9060 return
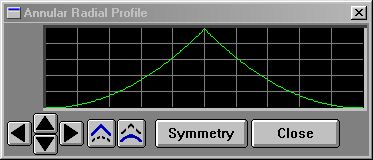
1/2 upwards curve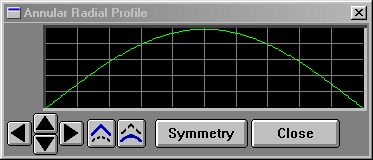
10 p$ = "annular"
20 pi = 3.141592653979382
30 for i=0 to 200
40 j = i/200
50 v = sin(j*pi)*255
60 a = SETPROF(p$,i,v)
70 next i
You'll find the names for all the system profiles located here.
|
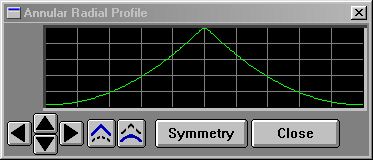
Full sinewave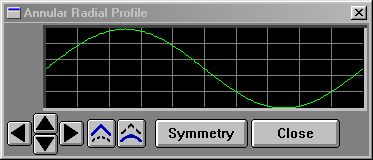
10 p$ = "annular"
20 pi = 3.141592653979382
30 for i=0 to 200
40 j = (i/200)*2
50 v = ((1+sin(j*pi))/2)*255
60 a = SETPROF(p$,i,v)
70 next i
You'll find the names for all the system profiles located here.
|
Upwards Ramp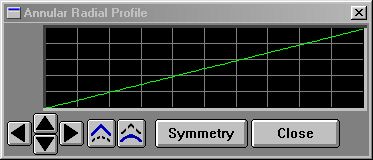
10 p$ = "annular"
20 for i=0 to 200
30 j = (i/200)
40 v = j*255
50 a = SETPROF(p$,i,v)
60 next i
You'll find the names for all the system profiles located here.
|
Downwards Ramp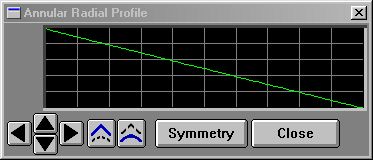
10 p$ = "annular"
20 for i=0 to 200
30 j = (i/200)
40 v = (1-j)*255
50 a = SETPROF(p$,i,v)
60 next i
You'll find the names for all the system profiles located here.
|
Multiple Cycles of Sinewave (5)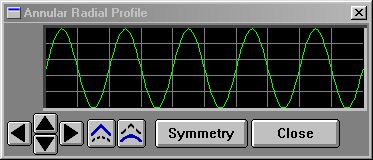
10 p$ = "annular"
20 pi = 3.141592653979382
30 for i=0 to 200
40 j = (i/200)*2
50 v = ((1+sin(j*pi*5))/2)*255
60 a = SETPROF(p$,i,v)
70 next i
You'll find the names for all the system profiles located here.
|
Using STEP() to obtain square waves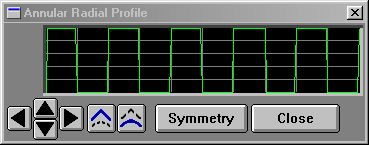 10 p$ = "annular" 20 pi = 3.141592653979382 30 for i=0 to 200 40 j = (i/200)*2 50 v = STEP((1+sin(j*pi*5))/2,.5)*255 60 a = SETPROF(p$,i,v) 70 next i This example feeds the portion of the sinewave formula that results in a since of 0 to 1 to the STEP() function, with crossing parameter of .5. That produces a result of 0 below .5, 1 above .5.
You'll find the names for all the system profiles located here.
|
Using SMOOTHSTEP() to obtain squarish waves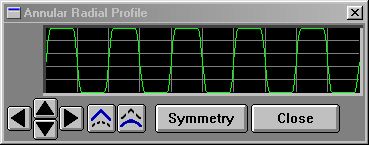 10 p$ = "annular" 20 pi = 3.141592653979382 30 for i=0 to 200 40 j = (i/200)*2 50 v = SMOOTHSTEP((1+sin(j*pi*5))/2,.3,.7)*255 60 a = SETPROF(p$,i,v) 70 next i This example feeds the portion of the sinewave formula that results in a since of 0 to 1 to the SMOOTHSTEP() function, with edge parameters of .3 and .7. That produces a result of 0 below .3, 1 above .7, and a smoothly changing value between the two. This can help you avoid the harsh edges produced by the STEP() function if it is too fierce for you.
You'll find the names for all the system profiles located here.
|
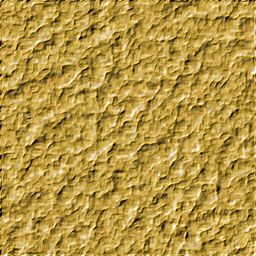
Using CLAMP() to limit excursions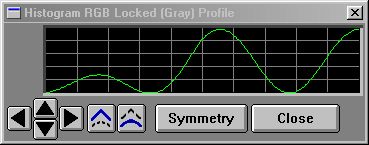 200 REM makes sine wave cycles 210 c = 2.25 220 p$ = "histo" 230 pi = 3.141592653979382 240 for i=0 to 200 250 j = (i/200)*2 260 v = ((1+sin(j*pi*c))/2)*255 270 a = SETPROF(p$,i,v) 280 next i 290 return 300 REM rampulates from 0-1 by 1/2 profile distance 310 p$="histo" 320 for i=0 to 200 340 a=SETPROF(p$,i,GETPROF(p$,i)*CLAMP((i/200)*2,0,1)) 350 next i 360 return The example image above shows what happens if you call the subroutines at 200, then at 300. The first subroutine produces a 2.25 cycle sine wave of full amplitude. The second reads that back from the profile, then multiplies each profile value by a ramp that would go linearly from 0-2 over the length of the profile ((i/200)*2) except it was fed to CLAMP() with limits of 0 and 1. So what happens is that when the ramp hits 1, it stays there, period. So the sine wave goes from 0 to full amplitude from the begining to 1/2 the profile, and after that it just stays at full amplitude. This example was taken from a metallic texture generating script that remaps linear brightness into a semblance of metallic reflections.
You'll find the names for all the system profiles located here.
|
WinImages F/x has a series of useful scripting functions you can use to control waveforms. They are:
If you want to be a profile wizard, you'll want to look into all of these!
| Quick Nav Bar | ||||||||
|---|---|---|---|---|---|---|---|---|
| << Previous | Contents |
Selection |
Op Index |
Parent | User Notes |
Index |
Glossary |
Next >> |
| WinImages F/x Manual Version 7, Revision 5, Level B |