| Quick Nav Bar | ||||||||
|---|---|---|---|---|---|---|---|---|
| << Previous | Contents |
Selection |
Op Index |
Parent | User Notes |
Index |
Glossary |
Next >> |
| a=RULER(ALIGN, offset, start, NUMPRI, NEWIMAGE, nr, ng, nb, na, gr, gg, gb, ga, bar, bag, bab, baa, bor, bog, bob, boa) |
| Items in CAPS are 0/1 switches or switches with more options than 0/1. |
![]()
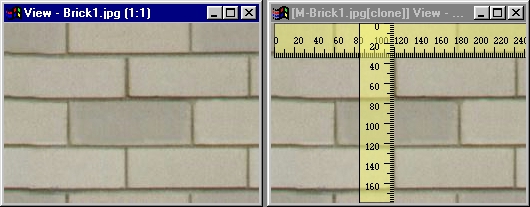
The Ruler operator renders a ruler as long as the width or height of the selected image. The ruler measures pixels. Large gradients mark every 20 pixels, medium gradients mark every 10 and the small gradients mark every other pixel. This ruler can replace a part of the image or be rendered as an image all its own. This operator works with layered images. If you decide to create a new image from a layer you have the option of adding it to the layered image. Adding a new ruler to the layered image will bring it to the front immediately. The ruler does not display coordinates, that's already a feature of WinImages F/x. This operator provides the functionality of a real ruler for on-screen elements.
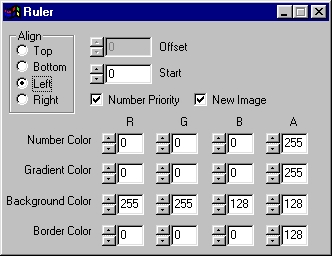
Align
This orients the ruler. A bottom-aligned ruler will have gradients on the top, top-aligned will have gradients on the bottom, left-aligned will have gradients on the right and right-aligned will have gradients on the left. If new image is not chosen, it will align the ruler against it's corresponding edge. These rulers can be moved farther into the image with the offset option, more below.
Offset
This option works only when the operator doesn't create a new image. If applicable, offset will move the ruler away from its starting position. Offset will never push the ruler off the edge of the image, any offset that would place the ruler past the edge will make it land on the opposite side.
|
Start
This number determines the number at the beginning of the ruler. From there, the ruler will measure normally. Choosing 8 would set the beginning value to 8, the 1st large mark would be 28, etc.
Number Priority
This feature determines the order in which the elements of the ruler are drawn. If the box is checked, it will draw in this order: background, border, numbers, then gradients. Otherwise, the ruler will be drawn in this order: background, gradients, numbers, border.
This is important because the border covers the bottom of the gradients and part of the numbers on the sides. If the color for both the border and the gradients/numbers are the same, the number priority is of no consequence. If the colors differ significanly, choosing number priority will put part of the gradients and part of the numbers on top of the border, so they will be more visible. If number priority is not chosen, the border will lay over everything on the edge of the ruler
New Image
This checkbox determines if the operator will create a new image or draw the ruler over part of the image. Creating a new ruler image inside of a layered image will give you the option of making the ruler a new layer to the image. If the operation is working inside the timeline, no new image will be created, it will act as if New Image was not selected.
Number, Gradient, Border and Background colors
This determines the color for any element of the ruler. You can choose any colors you want, the ruler defaults to a pale yellow background, black gradients numbers and outline, all opaque. Values for each color channel range from 0 to 255.
| Quick Nav Bar | ||||||||
|---|---|---|---|---|---|---|---|---|
| << Previous | Contents |
Selection |
Op Index |
Parent | User Notes |
Index |
Glossary |
Next >> |
| WinImages F/x Manual Version 7, Revision 5, Level B |