| Quick Nav Bar | ||||||||
|---|---|---|---|---|---|---|---|---|
| << Previous | Contents |
Selection |
Op Index |
Parent | User Notes |
Index |
Glossary |
Next >> |
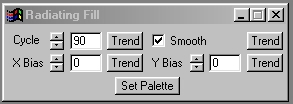
| a=RADIAL(cycle, xbias, ybias, SMOOTH) |
| Items in CAPS are 0/1 switches or switches with more options than 0/1. |
![]()
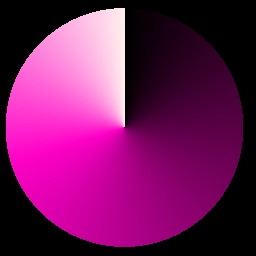
The Radiating Fill operation will fill the selected region in a radiating manner. The colors in the palette will radiate from a center position like spokes on a wheel. You can control where the center of the area is, and you can also Cycle the colors in the palette. The Radiating Fill operation also allows you the option of using smoothed or unsmoothed palettes. This tool is useful for creating cycled colored ranges in text and other objects.
This operator can use Pixel Transfer Modes to generate output image and layer data. These modes add a great deal of flexibility to what you can do with this operator. Only operators that create new image or layer data use pixel transfer modes. Also, plugins may use them if the plugin designer takes care to use the plugin masked write services.
|
Trends
You will notice that all of the controls have a Trend button next to them. The trend button allows you to set that variable over a set of frames. Each frame of the animation can be thought of as a slice of time. The trends allow you to alter some, all, or none of the variables for a particular time slice. You will notice that the trend graphs have equidistantly spaced vertical lines. Each of these lines represents a frame in the animation. The number of frames can be altered using the Sequence controls... in the Timeline pull down menu. Animation lengths of 100 - 999 frames will be represented with a vertical bar being 10 frames, and animation length greater than 1000 frames will have a vertical bar for every 100 frames. Click here to view more information on Trends.
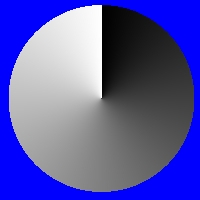 Cycle of 0 |
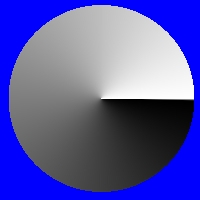 Cycle of 1/4 palette size |
Cycle
The cycle control allows you to shift the palette to create a cycling effect for animations. This control ranges between 0 and 360 degrees, where 0 and 360 are the same value. Imagine that the palette is a wheel with all of the colors radiating from the center as spokes, like the image on the left. This image is a representation of the palette with the Cycle control set to 0 degrees, and using the default gray scale palette. Notice that Black (the initial color zero) is at the 12 o'clock position. The image at the right shows a shift in the palette to a Cycle of 90 degrees. Notice that the original color zero has shifted to the 3 o'clock position (90 degrees), and a new color zero is in the initial position. From these two examples it is clear that increasing the Cycle value will shift or rotate the palette. This will in turn set a new color zero for the fill. If you were to trend the cycle over an animation from 0 to 360 degrees, you would see the colors of the palette cycle as they do in the example animation above.
X Bias
The X Bias control allows you to set the horizontal component of the Radiating Fill's center. This center position is measured as a percentage value between -100 and 100, where -100 is the maximum horizontal movement left, and 100 is the maximum horizontal movement right. A setting of zero will result in the X and Y center being in the actual center of the area select. This value can be trended over time to create the "tumbling" effect seen in the words "Radiating Fill" in the above animation example. You can also trend the X Bias in conjunction with the Y Bias to create new and unusual animation effects.
Y Bias
The Y Bias control allows you to set the vertical component of the Radiating Fill's center. This center position is measured as a percentage value between -100 and 100, where -100 is the maximum vertical movement down, and 100 is the maximum vertical movement up. A setting of zero will result in the X and Y center being in the actual center of the area select. This value can be trended over time to create the "tumbling" effect seen in the words "Radiating Fill" in the above animation example. You can also trend the X Bias in conjunction with the Y Bias to create new and unusual animation effects.
Smooth
The Smooth control allows you to smooth colors in the palette. This control is most effective in low color palettes (palettes with less than 256 colors). This control, when activated, will examine the colors in the palette and then smooth them to create a nice color spread between palette colors. For example, a palette of two colors using the Smooth control will look much nicer than a two color palette without smoothing. This control defaults to on, but can be shut off at any time by simply clicking on the check box.
Set Palette
The Set Palette button allows you to access WinImages F/x custom palette controls. This allows you to make any necessary alteration to the current palette or to load a previously saved palette. Remember, any changes made to the palette will be reflected the next time a fill is applied. If you would like to learn more about the set color dialog, Click Here.
When this operator is dragged into the timeline, palettes will automatically trend to the next palette, if another exists in the timeline.
| Quick Nav Bar | ||||||||
|---|---|---|---|---|---|---|---|---|
| << Previous | Contents |
Selection |
Op Index |
Parent | User Notes |
Index |
Glossary |
Next >> |
| WinImages F/x Manual Version 7, Revision 5, Level B |