
| Quick Nav Bar | ||||||||
|---|---|---|---|---|---|---|---|---|
| << Previous | Contents |
Selection |
Op Index |
Parent | User Notes |
Index |
Glossary |
Next >> |
| a=BALANCE(red, green, blue, FORCE DYNAMIC) |
| Items in CAPS are 0/1 switches or switches with more options than 0/1. |
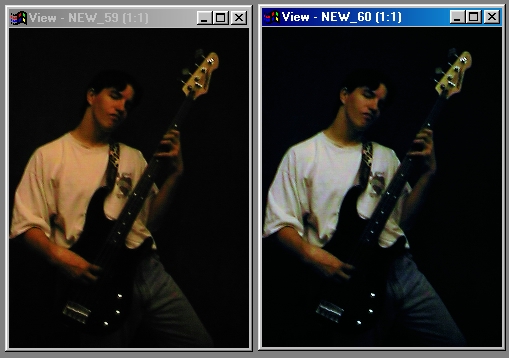
The Balance operation allows you to sample a color, and then specify a new color as the original color. This means that you could take the brightest portion of the image and specify it as white. The Balance operation will then adjust the entire image with the new values. The Balance operation can be used to simulate tinting, eliminate a yellowish tinge to old photographs, or even to bring out greater image detail in a dark image. You have the option of balancing the sampled color to white, black, gray, or any other color that you like. The Balance operation works like this:
|
Trends
Some of the controls have a Trend button next to them. These trend buttons allow you to set variables over a series of frames. Each frame of any animation may be thought of as a slice of time. The trends allow you to alter some, all, or none of the variables for a particular time slice. Trend graphs have equidistantly spaced vertical lines. For animations under 100 frames in length, each of these lines represents a frame in the animation. The number of frames in any one sequence can be altered using the Sequence controls item from the Timeline pull down menu. Animation lengths of 100 - 999 frames will be represented with a vertical bar being 10 frames, and animation length greater than 1000 frames will have a vertical bar for every 100 frames. Click here to view more information on Trends.
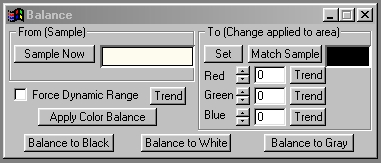
Pick Color
Pressing this button will access the Color Selection dialog. You may then select a color from the palette or any of the preset colors as Balance Color. You may not select the Sample Color. Selecting the sample color will result in a null operation. If you would like to view more information on the Color Selection dialog, Press Here.
Red
This control allows you to adjust the amount of Red in the Balance Color. This control can be set using the slide gadget or by entering the appropriate value in the provided text entry field.
Green
This control allows you to adjust the amount of Green in the Balance Color. This control can be set using the slide gadget or by entering the appropriate value in the provided text entry field.
Blue
This control allows you to adjust the amount of Blue in the Balance Color. This control can be set using the slide gadget or by entering the appropriate value in the provided text entry field.
Force Dynamic Range
This control, when selected, will force a dynamic range based on the Sampled Color. A dynamic range goes from maximum brightness to minimum brightness in the same selected area. This selection will stretch the Sampled Color into a dynamic range in the specified area.
|
Presets:
Balance to Black
This will make the specified Sample Color black. The rest of the image will then be adjusted based on the new black value. This process is useful in removing the yellow tint from old photographs. If the Sample Color is not the darkest region in the selected area, then any other regions that are darker will also be pushed to black. This can result in loss of image information.
Balance to White
This will make the specified Sample Color white. The rest of the image will then be adjusted based on the new white value. This process is useful in removing the yellow tint from old photographs. If the Sample Color is not the brightest region in the selected area, then any other regions that are brighter will also be pushed to white. This can result in loss of image information.
Balance to Gray
This will make the specified Sample Color gray. The rest of the image will then be adjusted based on the new gray value. This process is useful in removing the yellow tint from old photographs. This operation produces a smoother balance than the Black and White Balance presets.
| Quick Nav Bar | ||||||||
|---|---|---|---|---|---|---|---|---|
| << Previous | Contents |
Selection |
Op Index |
Parent | User Notes |
Index |
Glossary |
Next >> |
| WinImages F/x Manual Version 7, Revision 5, Level B |