Output Color Reduction Dialog
| Quick Nav Bar | ||||||||
|---|---|---|---|---|---|---|---|---|
| << Previous | Contents |
Selection |
Op Index |
Parent | User Notes |
Index |
Glossary |
Next >> |
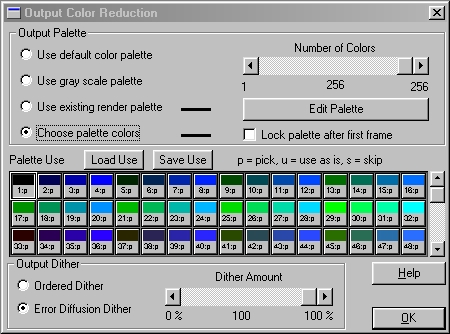
The output color reduction panel has an area in the middle of the dialog which allows the user to select which colors will be used for the next output render (see dialog above). Each color in the current palette appears as a color cell with a colored button located beneath it. This colored gadget is a three state button that is used for determining how that color will be used during the color reduction process.
The first state (represented by a gray button and the letter p for Pick) will result in that color position being reselected by the spectral color selection process. This color will then be used in the actual output render. This state is the default, and all new palettes will open with all color cells in this state.
The next state is represented by a white button and the letter u for Use, and it will ignore the color (leave it unchanged), and then will use the color in the rendered output. This allows you to keep any number of colors that you do not wish to have re-selected by the spectral color analysis.
The last state is the ignore or skip option, and it is represented by a black button and the letter s for Skip. This tells WinImages F/x that this color position should not change, and that it should not be used in the rendered output. This means that you can maintain a color in the palette, but then not have it alter the actual rendered output.
The actual dialog is very simple to use, and takes advantage of multiple cell selection for ease of use. To alter the "state" of the currently highlighted or selected color position, simply click on the color bar directly below its cell. This will alter the color bar from it current state, and change it to the next state.
These buttons are cyclic in nature which allows you to cycle through all of the option, and then returns you back to the original option. You have the ability to alter entire groups of colors using the standard shift-click method of selecting multiple objects. This is done by left clicking on the first color to change, and then pressing the Shift key and left clicking on the last color to change. This will alter the state of all of the colors between the first and last color to the new state of the first color cell.
If you do not wish to change the initial color's selection status, right click to select the cell without alteration. After you have done this you can use the shift click method to select the last color cell, and all cells in between. In this way you can alter the selection state of many colors with only a few simple mouse clicks.
After you have made all of the desired changes to the color selection or usage states of the colors in the palette, you can save the information using the Save Usage button. This will save all of the color and usage data for the current set of colors. The usage file can be re-loaded at any time for use with any sequence of images.
Another key element of the Output Color Reduction panel is the Number of Colors slider located at the top of the dialog. This slider allows you to select how many colors will be available in the palette. For example, if you wanted to create a 64 color render, you would set the number of colors option to 64. You could then render the image using the current palette's first 64 colors, or create a new palette using the Build Palette operation.
Use Default Palette
This option, when selected, will render the image using a default set of colors. These colors are predetermined for both 16 and 256 color renders. A 16 color render will use the default Windows palette for rendering, and a 256 color render will use a preset palette designed at Black Belt Systems to produce high quality renders without any color selection. This method is the fastest render method, but also has the lowest quality.
Use Gray Scale Palette
The Gray Scale Palette render option will render the output in either 16 or 256 gray levels. The gray scale palettes are predetermined which makes the gray scale render very fast.
Use Loaded Effects Palette
This option will use the range of colors which is currently loaded into the effects palette. This range of colors can be specified manually or by loading a specific effects palette file. The render operation will then use the colors in the effect palette as the render palette for the output files. This option is ideal for using a very specific palette for an output animation or sequence of files. WinImages F/x will only use the number of colors specified in the effects palette. For example, if you were doing a 256 color Bitmap render with only 240 colors in the effects palette, the rendered bitmap would only use the available 240 colors. The same is true for any number of colors. This means that it is possible to render a 256 color output with only 2 colors in the effects palette. If you were to create a 16 color bitmap with 256 colors in the effects palette, only the first 16 would be used.
The effects palette can be altered by selecting the Edit Palette option located to the right of this control. Pressing the Edit Palette button will access the palette controls. You then have the option to load or manipulate a palette in any manner that you like (see the Palette Controls for more details). Once you have the desired output palette, select the Close button. This will place you back in the main WinImages F/x workspace. If you have any further color reductions to make, select the Output Color Reductions option again to make your adjustments. After you are satisfied with your selection, select the Ok button to exit the dialog. These changes will remain valid until they are changed by you. All non-24bit files saved will use the specified color reduction method.
Choose Palette Colors
This option will allow WinImages F/x to use its custom color selection process to select the best colors possible for the output image. The Spectral Color Selection process will determine the output colors which best represent the colors in the actual image. This format is valid for both 16 and 256 color render modes. This option also has two special selection that can modify the way the colors are selected. The first is Update Palette from Render. This control will automatically update the effects palette with the colors selected for the output render palette. You can then save this effects palette for latter use. The second option allows you to lock the color selection after the first frame of a sequence is generated. This means that the render palette that is selected for the first frame in the sequence will be used for all remaining frames. This is useful for creating animations that contain a single render palette for all of the frames. These two options can be used together, or independent of one another. Please refer to the documentation below for more details on these two options.
Edit Palette
The Edit Palette button will access WinImages F/x's effects palette. This palette can then be adjusted, altered, or a new palette can be loaded for use as the render palette. Once you have the desired palette, select the Close button to exit the palette. You can then use the Use Loaded Effects Palette to generate a frame or sequence of frames which use the effects palette as the output render palette. This is very useful for creating output files or animations that use the same exact palette for each file or frame. It is important to remember that the last set of colors in the effects palette will be the one that is used for all renders that use the effects palette. This palette can be changed at any time, and is saved upon exiting the effects palette.
Update Effects Palette from Render
This option, when selected, will update the current effects palette with the colors selected by the spectral color selection process. This will only occur if the Choose Palette Colors option is also selected, and can only be used with that option. This feature is nice for "grabbing" the palette from an image. This palette is automatically placed into the effects palette, and will remain their until a new palette is loaded or WinImages F/x is closed. You then have the option to save the palette that was created as a regular palette file. This allows you to load the palette whenever it is needed for operations or rendering.
Lock Palette after First Frame
This option, when selected, will determine the render palette from the first frame of the animation sequence. This control is used in conjunction with the Choose Palette Colors option, and is only really useful for batch processing files or animation files. Once selected, WinImages F/x will determine the render palette from the first frame in the sequence. This render palette is then used for all of the remaining frames. This method is nice because it allows you to use WinImages F/x's superior spectral color selection technology, while keeping the total render time to a minimum. This is due to the fact that the render palette is only selected for the first frame. All frames after that will use the same render palette as the first frame. This will decrease the total amount of time needed to finish rendering the remaining frames.
Ordered Dither
Ordered Dither will dither the image based on the current pixel, and that pixels location in the actual image. This type of dithering will generally produce a lower quality image, but is necessary for animation that will be using any type of compression. The ordered dither allows for a great deal of interframe compression, which is needed to compress animation files. This type of dithering should only be used for the output of animation files. If you want to produce higher quality output images (not animations), you should use the EDD dither method. If you want to produce even higher quality render, you should use 24-bit file or animation formats. Remember, the quality of the final result is directly related to the quality of the initial image.
Error Diffusion Dither
Error Diffusion Dither (or EDD) will dither the image based on the specific pixel colors, and the colors of neighboring pixels. This will generally produce the highest quality dithering in the image, with the best possible colors being represented by the dither. This is done at the expense of adding more "noise" to the image. This means that in some cases the dither is easier to perceive. This type of situation can by remedied by decreasing the dither amount, or by always working with 24bit files and output images. Remember, the quality of the final result is directly related to the initial image quality.
Dither Amount
The Dither Amount control is used to specify the percentage amount of dither in a render. This amount can range from 0 (no dither) to 100 (maximum dither). The dither amount can effect the amount of intraframe compression over the sequence. This can reduce the overall size of the animation frame. You can achieve greater interframe compression by selecting the ordered dither option instead of the EDD dither. Ordered dither, by nature, will give you more interframe compression in animation formats like AVI.
|
Next, you need to set GIF's single transparent color in the color use area of output color reduction dialog. This is done by right-clicking on the color.
|
Lastly, you need to create transparent alpha in the image where you want the transparent color to be used.
At this point, saving to GIF should produce the desired results.
Next, create a palette that is appropriate for the image. You can do that with the appropriate palette generation operator in the standard group, or you can use one of the preset palettes.
Next, you need to set GIF's single transparent color in the color use area of output color reduction dialog to the first color in the output palette. This is done by right-clicking on the top left color.
|
Now, since you have assigned the first color (top left) in the palette as the transparent color, and since you've told WinImages F/x it is not to use that color (in other words, to skip it), there will be no transparent areas rendered in the GIF image when you create it using the Save or Save As dialogs.
| Quick Nav Bar | ||||||||
|---|---|---|---|---|---|---|---|---|
| << Previous | Contents |
Selection |
Op Index |
Parent | User Notes |
Index |
Glossary |
Next >> |
| WinImages F/x Manual Version 7, Revision 5, Level B |