Page 278
Other Tools

Filmstrip Button
The Filmstrip Tool
This icon will open and close WinImages F/x's Filmstrip controls. These controls can be used to view animations created in the Timeline, or to keep a visual log of images that you have processed. The controls are similar to the controls of a VCR (Play, Stop, Rewind, Fast Forward, etc.). If the filmstrip is not already active, pressing this button will open the filmstrip and bring it to the front of the display. If the filmstrip is already open, then this button will close the filmstrip. It is important to remember that closing the filmstrip in this manner will force the filmstrip to eject its contents. This means that all frames in the filmstrip will be lost.
Press Here to view further information of the filmstrip and its controls.

Timeline Button
The Timeline Tool
The Timeline icon is used to open and close WinImages F/x's powerful Timeline. The Timeline allows you to batch process images, animate effects, and create animations ranging from simple to spectacular. If the Timeline is not currently open, pressing this button will open the Timeline and bring it to the front of the display. If the Timeline is already open, pressing this button will close the Timeline. Closing the Timeline will not result in the loss of the Timeline information (operation, area selections, and image files). As a matter of fact, it is possible to generate a Timeline while the dialog is closed. Pressing the Timeline icon again will bring the current Timeline to the front. The Timeline contains many controls and options which are explained in greater detail in the Timeline section of the documentation. Press Here to view further information on the Timeline.

Zoom & De-Zoom Button
The Zoom Tool
This tool allow you to zoom into the image, or if already zoomed, return the original non-zoomed image. The Zoom tool is activated by clicking on the zoom icon's upper right-hand corner located at the end of the Operation Tool Bar. Once the Zoom icon has been selected, your pointer will look like this: . Place the Zoom pointer over the view to be zoomed. Press and hold the left mouse button to select the zoom area. The zoom region rectangle is sized with the left mouse button, and is repositioned using both mouse buttons. Release both mouse buttons once the zoom rectangle is the desired size and position. This will zoom the area based on the size of the rectangle, and its relative position. A zoom will always occur with the center of the zoom being the center of the rectangle. Once an image is zoomed it can be zoomed any number of levels, down to 1 pixel filling the view. This is done by simply following the above procedure as many times as necessary. A simple 2x zoom can be accomplished by just clicking on the view with the zoom pointer. You also have the capability to scroll a zoomed area using the provided scroll bars.
The De-zoom tool will de-zoom all levels of magnification back to the original un-zoomed image. This is done by simply selecting the bottom of left-hand corner of the zoom icon. You can perform any of the operations at any zoom level. The De-zoom control can also be used to cause a "negative zoom" on a currently unzoomed image view. This is done by clicking on the De-zoom icon, and then clicking on an image view that is not currently zoomed. F/x will automatically perform a 2x negative zoom. This means that the image will appear to be surrounded by a solid color (this is set in the Display menu's Set Off Image Color option). Negative zooms can be extremely useful for placement of effects (animated and still) off the edge of an image. The effect will only appear on the image, but you can place part or all of the area selection off of the image. The image below shows a negative zoom image with an effect that was placed partially off of the image.
Modal Zoom
The Modal Zoom option is located in the Settings menu. This option alters the way that a zoom is performed by the program. If this option is not selected (default) the zoom will behave as follows:
- Once the Zoom icon has been selected, place the Zoom pointer over the view to be zoomed.
- Press and hold the left mouse button to select the zoom area. The zoom region rectangle is sized with the left mouse button, and is repositioned using both mouse buttons. Release both mouse buttons once the zoom rectangle is the desired size and position. This will zoom the area based on the size of the rectangle, and its relative position. A zoom will always occur with the center of the zoom being the center of the rectangle.
- Once an image is zoomed it can be zoomed any number of levels, down to 1 pixel filling the view. This is done by simply following the above procedure as many times as necessary. A simple 2x zoom can be accomplished by just clicking on the view with the zoom pointer. You also have the capability to scroll a zoomed area using the provided scroll bars.
If this control is selected, the zoom tool will behave as follows:
- Press the zoom icon. You should notice that the zoom icon is now pressed in. This means that you are in zoom mode, and no other action will occur in the image views except zooming.
- To zoom in on an image left click the over the area you wish to zoom. To zoom in further left click again. You can continue to zoom in by left clicking, or you may select to zoom out by right clicking.
- After you have finished zooming or de-zooming the image, double click the zoom icon on the tool bar to turn zooming off.

Undo & Redo Button
The Undo Tool
WinImages F/x has a multiple Undo buffer system. You may have between 0 and 20
levels of Undo. This allows you to make up to 20 recorded changes to an image, and
then undo only the last 6 alterations. The number of undo levels is set in the
Settings pull down menu.
|
Warning:
 |
Remember that each level of undo will require the area selects width x height x 4. This means that with 20 levels of undo, and an area select that is 20 pixels x 30 pixels, you would need 48,000 bytes of memory. Some of the operations in WinImages will require an undo buffer that is the size of the entire image. This Undo buffer will automatically be allocated if you do not already have any Undo levels available. |
|
Selecting the Undo icon (bottom left-hand corner) will present you with a list of all of the operations that may be undone...
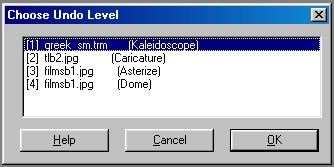
Undo Dialog (when multiple images have been changed)
...this list will be dependent on the settings in the Number of Undo Levels control, and how many operations have been applied. The list will be in reverse chronological order with the last operation appearing at the top of the list, and the first operation will be at the bottom of the list. Selecting the top listing will undo only the last operation. Selecting an operation further down in the list will undo all of the operations that occurred to that image after and including the listing selected. Each listing will specify the name of the image, its Undo number, and the operation that was applied. If you go beyond the set number of Undo levels the oldest operation will be dropped from the list, and can not be undone.
The DeUndo will only work if an Undo level has been undone. The DeUndo option is activated by clicking the top right-hand corner of the undo icon. The DeUndo works the opposite of the Undo tool. All items that have been undone will appear in the DeUndo list...
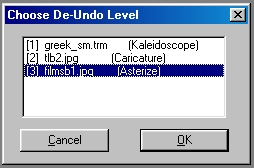
Redo Dialog (when multiple images have been changed)
...the list will only be available for undoing an Undo until the next operation is carried out. Performing an operation will clear the DeUndo list. The list will be in chronological order with the first undone operation at the bottom of the list. Selecting something in the middle of the list will deundo all levels below it.
See Also: Setting the Number of Undo Levels
Page 278
WinImages F/x, WinImages Morph and all associated documentation
Copyright © 1992-2007 Black Belt Systems
ALL RIGHTS RESERVED Under the Pan-American Conventions
| WinImages F/x Manual Version 7, Revision 5, Level B |
HTML Documentation Management System © 1992-2007 Black Belt Systems