| Quick Nav Bar | ||||||||
|---|---|---|---|---|---|---|---|---|
| << Previous | Contents |
Selection |
Op Index |
Parent | User Notes |
Index |
Glossary |
Next >> |
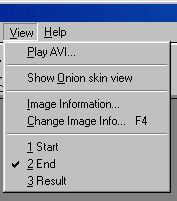
Play AVI...
This option will play any AVI animation file that was just created using the Time Line, or WinImages Morph. The AVI will automatically be opened by morph, but must be closed by the user. This option will only play AVI files if the windows media player is set up on your system. If you would like to animate any other file type in the program, you should select the play option on the filmstrip.
Show Onion Skin View...
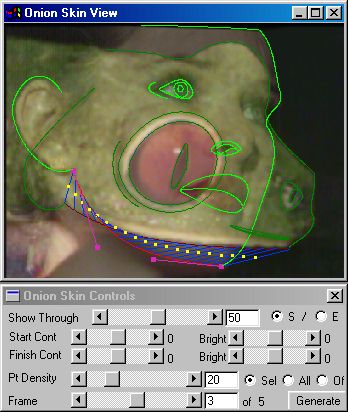
The Onion Skin Transparency window gives you an alternative method for examining start and end image point correlations. This special window will appear with both the start and end images super-imposed over each other, with lines of correspondence running from the start image objects and the end image objects.
The onion skin dialog contains many controls for altering the appearance of the onion skin transparency/images, the current frame values, and the number of points in a line or curve object. Seeing this correspondence of objects for a sequence of frames can give you a better idea of how the points and other objects will interact and move for the sequence. This window can also be used for specifying new object files. This method of object specification works in the same manner as the regular start/end image view object creation.
After an object has been specified for both the start and end images, lines of correspondence will appear from the start image object to the end image object. At this point you can increase or decrease the number of points, or leave the object as they are. You can also use the onion skin window for editing existing objects and point sets by using the standard editing tool, and the provided S (start) and E (end) image toggles. Pressing the S or E buttons will cause the start or end image to be currently "on top" of the other image.
By toggling between the two image views, you can do all of the standard object creation and editing as if the views were separate from one another. You will notice that the "regular" start and end image views are still visible and active. This allows you to create new objects in the regular image views, and immediately view the object correspondence in the Onion Skin window.
The onion skin window can be treated like any other window in the program. This means that the window can be resized, maximized, or minimized like any other image view. Below you will find complete documentation that details each of the controls in the onion skin window, and object creation and editing using the onion skin view.
The Controls:
Show Through:
The Show Through control allows you to adjust the level of transparency between the start and end image views in the onion skin window. The default setting (50) will result in the onion skin view containing 50% of the color information from the start and end image. Adjusting the slider to the left will give you more color information from the start image (make it more opaque), and adjustments to the right of 50 will result in more of the end image showing through. This means that you can have any amount of either image showing in the onion skin view. Editing and creating control objects is handled exactly the same regardless of this setting.
S/E:
The S and E (start and end) radio buttons allow you to switch the layering of the onion skin from start image objects on top to end image objects on top, and vice versa. This will also change which image is currently active for receiving input from the mouse. Clicking in the onion skin window with an object creation tool selected will result in a new object being specified in the currently active image (start or end). After you have completed the object creation for the start image (right mouse will stop the object specification for all object tools), alter the S/E button to the other image view and specify the corresponding object. You will see lines of correspondence between the two objects after you have completed the second object.
The same method can be used for editing an object in the onion skin window. Begin by selecting the object that you wish to edit. This can be done by using the Tab or Shift+Tab keystrokes to scroll through all of the objects, or you can press the Ctrl key and left click on the object that you want to edit. After you have finished editing the currently active image's object, switch to the other image and edit the object. You will see the lines of correspondence altering as the object is being altered. You can continue to edit other objects, or stop editing at this point.
S/E Contrast:
The Start and End image Contrast controls allow you to alter the onion skin image's contrast for the start and end image views. This particularly useful when the start and end images are very similar in color, and you would like to make one image more distinct than the other. Each control alters only the contrast of the start or end image (dependent on the slider that you are using). The contrast does not alter the actual images, only how they are displayed in the onion skin window. The actual images are never altered by the contrast adjustments. You should notice that after the contrast slider has been moved, the onion skin window is refreshed with the new image contrast information. Returning the contrast sliders to 0 will result in both images appearing un-contrasted in the onion skin window.
S/E Brightness:
The Start and End image Brightness controls allow you to alter the onion skin image's brightness for the start and end image views. This particularly useful when the start and end images are very similar in color, and you would like to make one image more distinct than the other. Each control alters only the brightness of the start or end image (dependent on the slider that you are using). The brightness does not alter the actual images, only how they are displayed in the onion skin window. The actual images are never altered by the brightness adjustments. You should notice that after the brightness slider has been moved, the onion skin window is refreshed with the new image brightness information. Returning the brightness sliders to 0 will result in both images appearing un-brightened in the onion skin window.
Selected/All/Off:
These controls allow you to specify which control objects will display their lines of correspondence. The first option is to show the currently selected object's correspondence lines. This will change as the current object is changed. The next option is to display all of the correspondence lines for all of the objects in the morph. It is important to remember that with a large number of objects, this selection can become confusing. The Off selection will display no correspondence lines, only the control objects themselves.
Frame:
The Frame control allows you to show the progression of an object for a particular frame. The control ranges from 1 to the total number of frames specified in the Sequence Controls dialog. If the Frame control is set to 1, then the current object's points will appear on the start image object. As the frame value is increased, the points will move along the line of correspondence until they reach the final frame in the sequence. At that point, all of the points will appear on the end image's control object. You can select to generate any of the frames in a sequence by setting the frame value with this control, and then pressing the generate button on this dialog. This will generate the specified frame at that time. If you would like to generate a sequence of frames, select the Sequence Generate option from the Generate menu.
Point Density:
The Point Density control allows you to specify the total number of points resolved within a line or curve. The default setting is 20 points for an object. This means that there are twenty distinct correspondence points along the line or curve. The number of points in a line or curve can be increased or decreased through this control. Increasing the number of points in a line or curve will give that particular object more priority than a line or curve with a lower density setting. For example, a line with a point density of 100 has a higher priority than a line with a density of 20. The number of points in a line will only effect the amount of time needed to setup the morph (this is the first step). It will not affect the amount of time to generate a frame. It is important to remember that lower point densities can lead to poorer output quality morph sequences.
Generate:
This option will generate the current frame as set by the onion skin Frame control. This generation process will create only a single frame, and should be used primarily as a preview tool. If you would like to generate an entire sequence of frames, please use the Sequence Generate option from the Generate menu.
Image Information...
This panel displays image information about the current views. This information includes the image name, pixel size, DPI, size (inches), size (millimeters), source file, image format or file type, bit depth, the parent image, and Alpha channel if it exists.
Change Image Information...
This dialog allows you to alter the Name, DPI setting, Parent Image, and if the image has an alpha channel for all of the current images. These changes are only temporary, and will be lost if the image is not saved. An image can be changed as many times as you like.
| Quick Nav Bar | ||||||||
|---|---|---|---|---|---|---|---|---|
| << Previous | Contents |
Selection |
Op Index |
Parent | User Notes |
Index |
Glossary |
Next >> |
| WinImages F/x Manual Version 7, Revision 5, Level B |