Page 293
Timeline Operation Dialog - Details

Timeline Operations Dialog
Get Current Settings
This selection will "grab" the current operation settings from the operation's dialog. This allows you to alter the settings of an operation in the dialog, and then place them into the current operation key frame without having to replace the current operation in the Timeline. This will only replace the current settings with the operation dialog's settings. It will not grab any trend information that has been specified for that dialog. If you want to place trend information into the current operation key frame, you should select the Get Settings from Trends option.
Get Settings from Trends
This option will take the current trend graphs from the operation's dialog. This means that you can set the trends for a Timeline operation even after the operation's icon has been placed into the Timeline. This selection will treat each of the operation's settings or parameters as trends. This means that even if a parameter remains constant over a sequence of frames, it will have an associated trend for this operation key frame. Trend curves do require more memory, but in most cases it is negligible. Trend curves allow for more precise control over an operation's parameters over time. If you would like to view further information on trends, please Press Here.
Set Current Settings
This option allows you to alter an operation's parameters, and have the alterations transferred directly into the Timeline. This means that any alterations made in the operation dialog will automatically be placed into the Timeline. WinImages F/x will continue to update the current operation key frame until a new operation or area selection is placed into the Timeline, until the current frame position is altered, or until you click in the Timeline dialog. Once one of these has occurred, WinImages F/x will break the link between the key frame and the dialog. The final adjusted settings for all of the parameters in an operation will be placed into that key frame's operation settings file. This option allows you to adjust and change the parameters of an operation without replacing it with another operation icon. Once this button has been pressed, the operation's dialog will be called to the front. At that point you should make the desired adjustments to the dialog. These adjustments will be saved when you close the dialog, or select a new key frame using one of the three methods described above.
Set Trends
The Set Trend option allows you to create a dynamic link between this Timeline level and an operation's trend settings. This means that any changes made to an operation on this level will be immediately reflected in the trend graph. For example, let's say you have a single operation icon on the current level, and you have selected the Set Trends option. You will then be allowed to set any or all of the desired parameter trends for that operation. If you were to then drop the same operation into the same level of the Timeline, the trends would be altered to reflect the changes in settings data. Changes made in the trends will not create new operation key frames. An operation key frame can only be created by placing the operation into the Timeline, or by copying an existing operation key frame from another position in the Timeline.
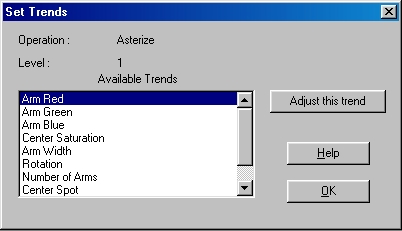
Set Trends Dialog
Selecting this option will present you with the Set Trend selection dialog. This dialog will contain a list of all of the trends available for that operation. A trend can be selected for manipulation by highlighting the trend name, and then selecting the Adjust this Trend button. You can then select another trend for adjustment by following the same procedure. Once you have all of the desired trends open, select the Ok button to confirm the selection and close the dialog. You can then draw the desired trend curves. Once you have finished drawing a curve, select the Ok button to close the trend graph and place the trend information into the Timeline.
Interpolate Settings
This control will turn the interpolation of operation settings on or off. When the control is on, the current operation settings will interpolate or tween their values over the specified number of frames to the next operation key frame. Operation interpolation is only available between the same operation. For example, it is possible to interpolate from one contrast setting to another, but it is not possible to interpolate between a contrast setting and a brightness setting.
Remove Operation
The Remove option will remove the current operation key frame from the Timeline. It will remove all associated settings, trends, and interpolation for that operation. The operation and its continuance arrow will be replaced by blank Timeline frames. A new operation can be copied or placed into those frames, or they can remain empty. It is important to remember that if an operation is removed, all of the associated settings will be lost. An operation key frame can also be removed by selecting the Delete key while the operation key frame is selected (highlighted).
Specify Source Image
This selection will open the Timeline Source Image dialog for the current frame. This dialog is used to specify a file, sequence of files, or an animation file to be used as the source image. This Specify Source Image option is only available for operations that require a source image. For example, this button will be unavailable for color fill operation because that operation does not require a source image. You can also specify a source image by double clicking on a Timeline frame that does not contain a key frame icon. This will open the Add to Timeline dialog. This dialog allows you to specify an operation, area selection, source image, or action image for the current level and frame position. Selecting the source option will present you with the same source image dialog described above.
Specify Action Image
This selection will open the Timeline Action Image dialog for the current frame. This dialog is used to specify a file, sequence of files, or an animation file to be used as the action image. This Specify Action Image option is available for all operations in WinImages F/x. You can also specify an action image by double clicking on a Timeline frame that does not contain a key frame icon. This will open the Add to Timeline dialog. This dialog allows you to specify an operation, area selection, source image, or action image for the current level and frame position. Selecting the action image option will present you with the same action image dialog described above. You can have multiple action image files on separate levels of the Timeline. This allows you to process a sequence of images, and then use the result as a source file for another operation.
Page 293
WinImages F/x, WinImages Morph and all associated documentation
Copyright © 1992-2007 Black Belt Systems
ALL RIGHTS RESERVED Under the Pan-American Conventions
| WinImages F/x Manual Version 7, Revision 5, Level B |
HTML Documentation Management System © 1992-2007 Black Belt Systems