|
| Quick Nav Bar | ||||||||
|---|---|---|---|---|---|---|---|---|
| << Previous | Contents |
Selection |
Op Index |
Parent | User Notes |
Index |
Glossary |
Next >> |
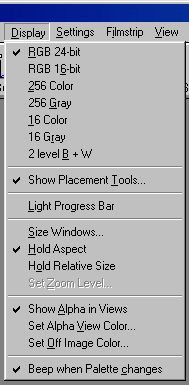
Display Depth
The first area of the menu is a list of display options that Morph will use for the start frame, end frame, result and film strip display. You should choose the mode that works best for your display adapter and monitor.
RGB 24-bit
For full color 24-bit displays.
This mode is the highest quality color representation possible. It is sometimes called photo-realistic, full color, or true color because each screen pixel exactly represents the color of images shown on it. 256 levels each of red, green, and blue are used allowing the full 16.7 million colors. It will be faster than any other display mode if you have a 24-bit display, however, it cannot be used effectively on low color displays.
RGB 16-bit
For 65,536 color displays.
Displays with 16-bit capability provide 32 levels of red, 64 levels of green, and 32 levels of blue; allowing 65,536 colors. The program dithers these limited color levels to approximate true 24-bit images.
256 Color
For 256 color (Super-VGA) displays.
Displays that use 256 colors (and displays with fewer colors) make use of a palette so that each of the 256 choices on screen become one of 256 possible red, green, blue combinations. The program selects an optimum palette and uses dithering so that the picture looks closely like the 24-bit image it represents.
256 Gray
For 256 level monochrome displays.
The 256 level monochrome display reaches the full range of brightness levels but without any color information.
16 Color
For 16 color (VGA) displays.
Although 16 color displays use a palette, the palette has to be preset for use by Windows. The program uses dither to it fullest, however a 16 color display can only achieve about 60% color accuracy. It certainly works, but we would encourage anyone who works with full color images to get a display with more color capability. There may be a compensating factor, however, if you have a very high resolution display, the number of pixels can make up for low color accuracy, similar to the way that magazine pictures get away with only four (or actually five) colors.
16 Gray
For 16 level monochrome displays.
This mode uses 16 levels of gray from black through to white, and dithers to achieve the look of full gray scale.
2 level B+W
Black and White display.
This uses just black and white with dithering to represent the gray component of images.
Show Placement Tools...
This selection will open or close the Placement Tools dialog. These tools are used to specify lines and points on the start and end images. Press Here for more information on these tools. These tools can also be accessed/closed by pressing the a/A keystroke.
Dark background
This is a switch which sets the main window to show either a gray or black background.
Size Windows...
The Size Windows... menu option opens a settings window that allows you to precisely set the size of the display area for the three view windows and the film strip window. Each of the Start, End, Result and Film strip windows can be sized. The exact view area of each window is shown in the Width and Height text boxes. The numbers here can be set manually to a desired size. By hitting the "Enter" key in a Height text box the associated window (and its image) is redrawn. The "Match Image" buttons set the associated window sizes to exactly match the size of the image, so each pixel in the image will be displayed "one for one" on the screen. Be careful though, if the image is larger than your entire display, not all of it will be visible.
The "Match Aspect" buttons set the associated window to display the image with the correct aspect ratio. You set the initial width of the window and the program determines the correct height for that width.
This dialog also contains controls for sizing the filmstrip control window. Selecting the Match Image control will cause the filmstrip window to be the same resolution as the last sized image. This is not the same as having the actual filmstrip the same resolution as the current action image. In this case we are only changing the size of the window, not the resolution of the contents. This can be changed through the Filmstrip menu's Filmstrip Pixel Resolution control. The filmstrip, and its controls, are always aspect correct.
|
The Rescale with Main window control will force all of the views to resize if the Main program window is resized. The Maintain Aspect Ratio button allows you to have all of the current views maintain their aspect ratio when resized. This control is also available in the Display pull down menu.
Hold Aspect
If Hold Aspect is selected then the display windows will be forced to show images in their correct aspect ratio. When this is turned off, view windows can be sized to any dimensions. If you size a view window with Hold Aspect selected, its height will be changed to match the width. When a new image is loaded, the appropriate window is resized automatically to match the aspect ratio of that image.
Hold Relative Size
This option, when selected, will force all of the image views (start, end, and result images) to match their actual size. This allows you to work on your images in a pixel exact or pixel for pixel mode. For example, if the start image was 320x200, then the start image view would appear as 320x200 in the program. If you zoom the image, then the image views will be resized to match the relative zoom size. If the example image described above was zoomed by 50%, then the image would appear as a 160x100 image. You may wish to turn this option off when zooming into an image.
Set Zoom Level
This option allows you to specify a percentage value for zooming into the image. The zoom percentage can range from a minimum of 1% to a maximum of 1100% of the original image size. A setting of 100% will result in the image being displayed in a pixel for pixel mode. This means that a 320x200 image will be displayed as 320x200 in the program. If you select a zoom ratio which is larger than the display resolution of the program, then morph will automatically size the image to an appropriate size on screen. You will then be able to use scroll bars to move through the image. WinImages Morph provides you with several standard zoom ratios, but you can always specify your own with the slide gadget. This option is only available if the Hold Relative Size option is selected.
Show Alpha in Views
WinImages Morph will display the alpha channel (image transparency) of images in the Start window, End window and Result window if the original images have alpha channels and if this menu item is checked. The alpha will be represented as a grey scale where black means fully transparent and white means fully opaque. Images that do not have an alpha channel will be displayed normally.
Set Alpha View Color...
This option is used to specify the alpha channels color for the Show Alpha in Views option. Selecting this option will bring WinImages Morph's color selection dialog to the front. You should use the provided color selection tools to select the desired alpha channel color, and then press the Done button. In the example image below, the Alpha View color has been set to a green color. If you would like to view more information on the Color Selection dialog, Press Here.
Set Off Image Color...
The Set Off Image Color option is used to specify the color that will appear at the image's edge in maximized or full screen mode. This color is set using the Color Selection dialog. This dialog has a wide range of tools, and preset colors which can be used as the "off image" color. If you would like to view more information on the Color Selection dialog, Press Here.
Beep when palette changes
This option simply turns on an informative beep sound whenever WinImages Morph changes or detects another program changing the display palette. On computers with 256 color displays, the palette is shared by programs. If another program has changed the display palette, WinImages Morph will redraw with a new palette, however some compromise in quality may occur.
| Quick Nav Bar | ||||||||
|---|---|---|---|---|---|---|---|---|
| << Previous | Contents |
Selection |
Op Index |
Parent | User Notes |
Index |
Glossary |
Next >> |
| WinImages F/x Manual Version 7, Revision 5, Level B |