|
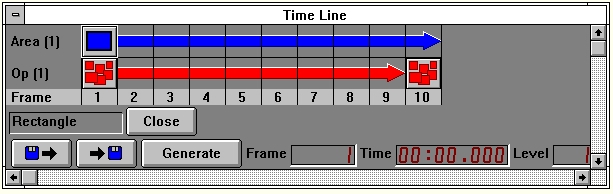
The icon will immediately change into an area selection icon (![]() ) until it is placed in the Timeline. You will want to place the area selection icon over the contrast icon in the first frame of the Timeline. The area selection will be placed above the operation, and the Timeline should look like this:
) until it is placed in the Timeline. You will want to place the area selection icon over the contrast icon in the first frame of the Timeline. The area selection will be placed above the operation, and the Timeline should look like this:
CAPTION
You should now place the remainder of the icons using the same procedure. You will place a polygon in frame five, and an IShape in frame nine. We will now set the interpolation for these frames. Since the default is to have the area selection interpolate, the only area selection icon that will need to be changed is the polygon area. You can access the interpolation control by double clicking on the polygon icon. This will access the Area Selection dialog for the Timeline. You will want to click on the interpolation check box to turn it off. After you have made this change, select the Ok button to confirm the selection and close the dialog. You should notice that the interpolation arrow has been turned off for the polygon area selection. This means that the polygon area selection will remain static over the sequence of frames. All of the other area selection have the interpolation "on" which means they will change from one area selection to another area selection over the sequence of frames.