Typical Timeline Based Operation
| Quick Nav Bar | ||||||||
|---|---|---|---|---|---|---|---|---|
| << Previous | Contents |
Selection |
Op Index |
Parent | User Notes |
Index |
Glossary |
Next >> |
This means that actions are defined from one key frame to another key frame. This allows for interpolation, commonly known as tweening.
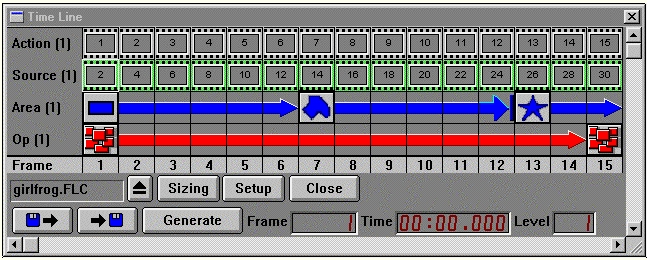
For example, the Timeline below depicts three separate area selections. The first is a rectangle, next is a polygon, and the last is an IShape The first area selection is set to tween (interpolate) into the second area selection (see the description below on how to determine if an operation is using interpolation). The second area selection does not interpolate, and the final area selection interpolates back to the initial area selection. This allows you to create animations with moving area selections, and effects.
A key frame is specified by the drag and drop method. This means that operations and area selections are placed in the Timeline by clicking and dragging the desired icon into the Timeline.
You can also specify a key frame by double clicking on an empty cell in the Timeline, or by pressing the Enter key with the pointer over an empty cell. A cell (or frame) is considered to be empty if there is no icon in that cell. If you are specifying images, then an empty cell is considered to be any cell that does not contain an image file icon, or any cell beyond the first frame of a video sequence. Double clicking or pressing Enter over an already specified key frame will bring up that key frames specific control dialog. These dialogs area discussed over the next five sections.
Notice that there are two different types of Timeline arrows. The first type of arrow ( ) shows that there is an interpolation from area select to area select (the same arrow is used for operation interpolation). Interpolating an area select or an operation means that the area (or operation) in the first key frame will change or alter it shape or settings to match the settings in the next specified key frame. For example, in the Timeline above the original area selection is a rectangle. This rectangle is then interpolated into a polygon over a course of seven frames. The polygon is then interpolated into an IShape over the next six frames. The same is true for operations.
The second type of Timeline arrow ( ) will simply complete the area selection or operation as specified from the initial key frame. This means that the effect will not be interpolated from key frame to key frame. The effect will be generated using the previous keyframe settings until a new operation is specified, or the end of the sequence is reached.
You can interpolate the control settings of operations by:
|
That is the basic procedure for creating an animated effect, but it definitely doesn't end there. You can have multiple key frames, operations, area selections, and source (or brush) and action files. You also have the option to use trends instead of interpolation. Trends allow you to specify the value of any integer valued operation parameter over the entire sequence. Controls that do not represent integer values such as floating point or palette controls will interpolate via key frames but do not have graph interfaces. For integer controls, this means that all of the values for each frame in the sequence will be determined by the settings in the trend graph. The use of trends reduces the necessity of multiple interpolations for complex animation effects.
All controls of an operation (including palettes, text strings such as filenames and profiles) can be placed using the Drag and Drop method. All action and source images are specified by double clicking on an operation, or by pressing the Enter key while over a non-key frame area. This will access the operation controls for setting sequences of action and source images. WinImages F/x also allows you to apply various effects on separate Levels. A Level can be defined as the order of application for operations and area selections. Each level of the Timeline can contain separate operations, area selections, and image files (generally you will only want to specify action and source or brush files in the first level).
Each level is executed in order for each frame. For example, if you had a Timeline which had ten frames and three levels, level one frame one operation would be applied first, then level two frame one operation would be next, and level three frame one operation would be the last operation for that frame. The frame would then be saved in the desired file format (as set in Sequence Controls dialog).
WinImages F/x uses three separate frame classifications for a Timeline frame. These classifications are Key Frame, Continuance Frame, and Empty Frame. A Key Frame specifies the beginning of an operation, area selection, or image file. A Continuance Frame is any frame that contains a portion of a key frame interpolation arrow. These frames specify the continuance or interpolation of an operation, area selection, or image file. The Empty Frame is the final frame type. An empty frame is any frame that is not a key frame or continuance frame. The rest of the controls and icons are explained in the detailed documentation below.
| Quick Nav Bar | ||||||||
|---|---|---|---|---|---|---|---|---|
| << Previous | Contents |
Selection |
Op Index |
Parent | User Notes |
Index |
Glossary |
Next >> |
| WinImages F/x Manual Version 7, Revision 5, Level B |